How to Add a Store Locator to Your Squarespace Website (Without Coding or API Keys)
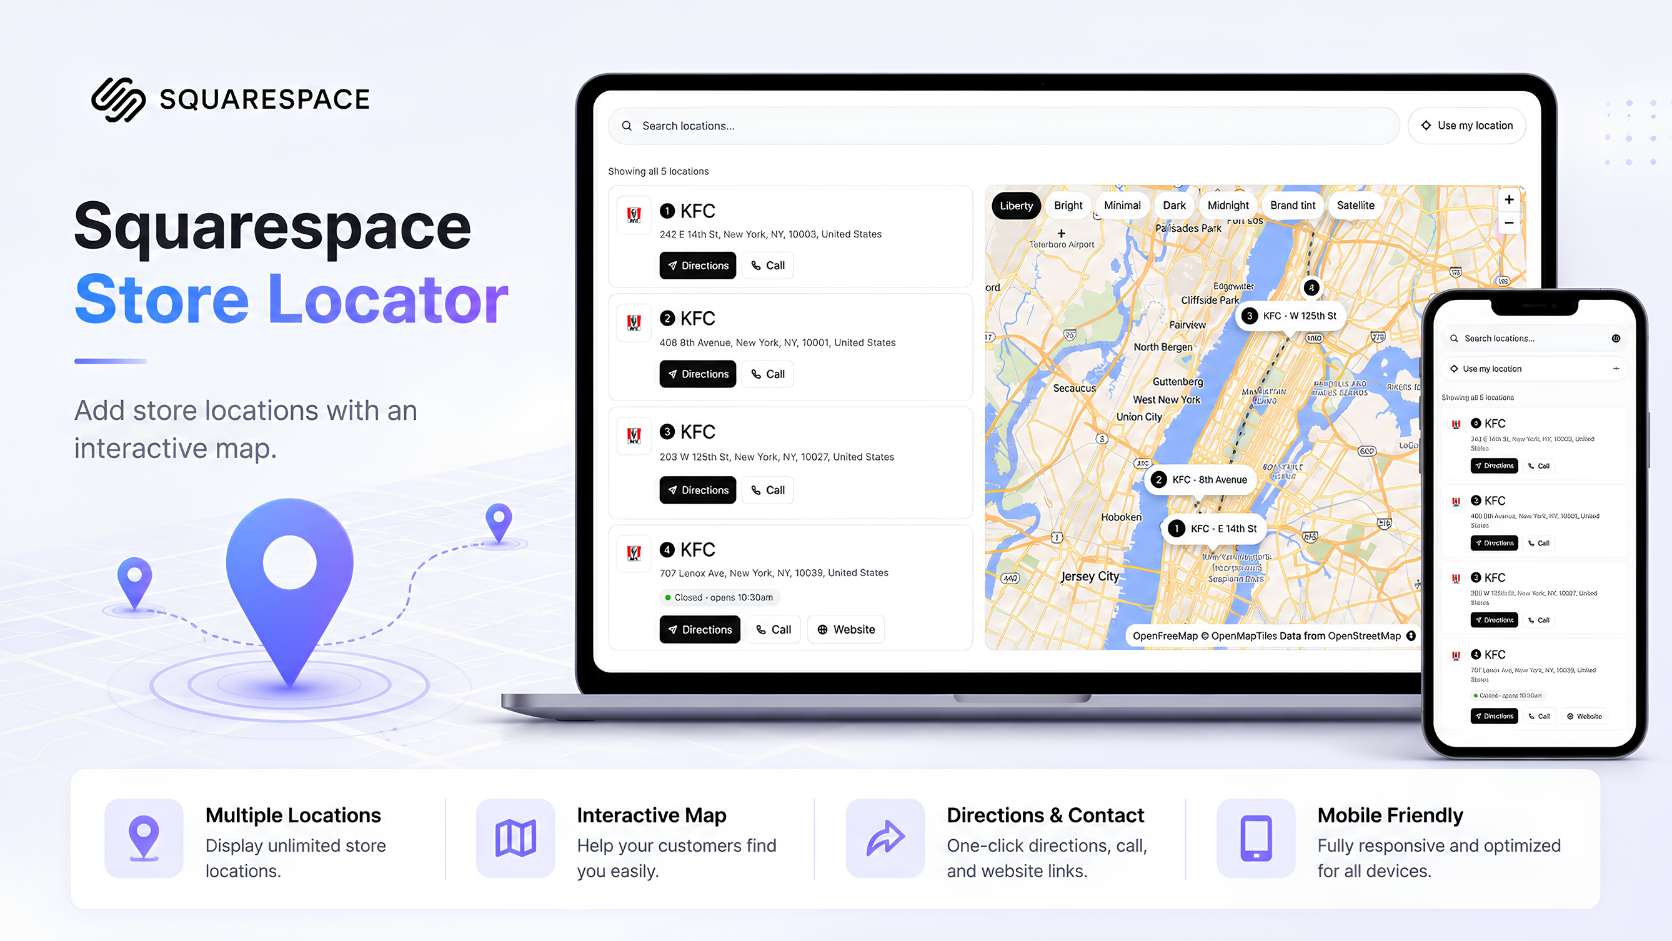
If your business has more than one physical location, your website visitors will eventually ask the same question: where is the closest one?
Maybe you run a chain of coffee shops across three cities. Maybe you have retail stockists in dozens of locations. Maybe you operate a service business with regional offices. Whatever the situation, people who land on your Squarespace website need a fast, simple way to find the location nearest to them.
The problem is that Squarespace doesn't include a built-in store locator. Its native Map Block is designed to show a single address on a contact page, not to let visitors search across multiple locations. That gap sends many business owners scrambling for workarounds, from stacking multiple map blocks on one page to attempting custom code embeds that break other parts of the site.
This guide covers what you actually need, why Squarespace's native tools fall short, what to look for in a store locator solution, and how to get a working location finder on your site without touching code or setting up API keys.
Why Squarespace Doesn't Have a Native Store Locator
Before exploring solutions, it helps to understand the limitation you're working around.
Squarespace offers a Map Block as part of its page editor. According to Squarespace's own documentation, this block embeds a Google Maps pin for a single address. Visitors can click that pin to open directions in Google Maps. You can choose from several visual styles (satellite, grayscale, dark, light), and you can toggle labels and zoom controls.
What the Map Block cannot do is display more than one location pin. Squarespace's help documentation states this directly: "Map blocks can only display one location pin." The suggested workaround is to add multiple map blocks to a single page, one for each location.
For a business with three locations, that might be tolerable. For a business with fifteen, thirty, or a hundred locations, it's completely impractical. There is no search box, no distance filtering, no location list, and no way for a visitor to type in their city or ZIP code and find the nearest result. Each map block simply sits on the page as a standalone pin.
This is a design choice, not a bug. Squarespace focuses on elegant, template-driven websites rather than specialized business tools. A store locator with search, filtering, and interactive maps is a specialized tool, which is why the platform leaves it to third-party plugins.
What a Proper Store Locator Actually Does
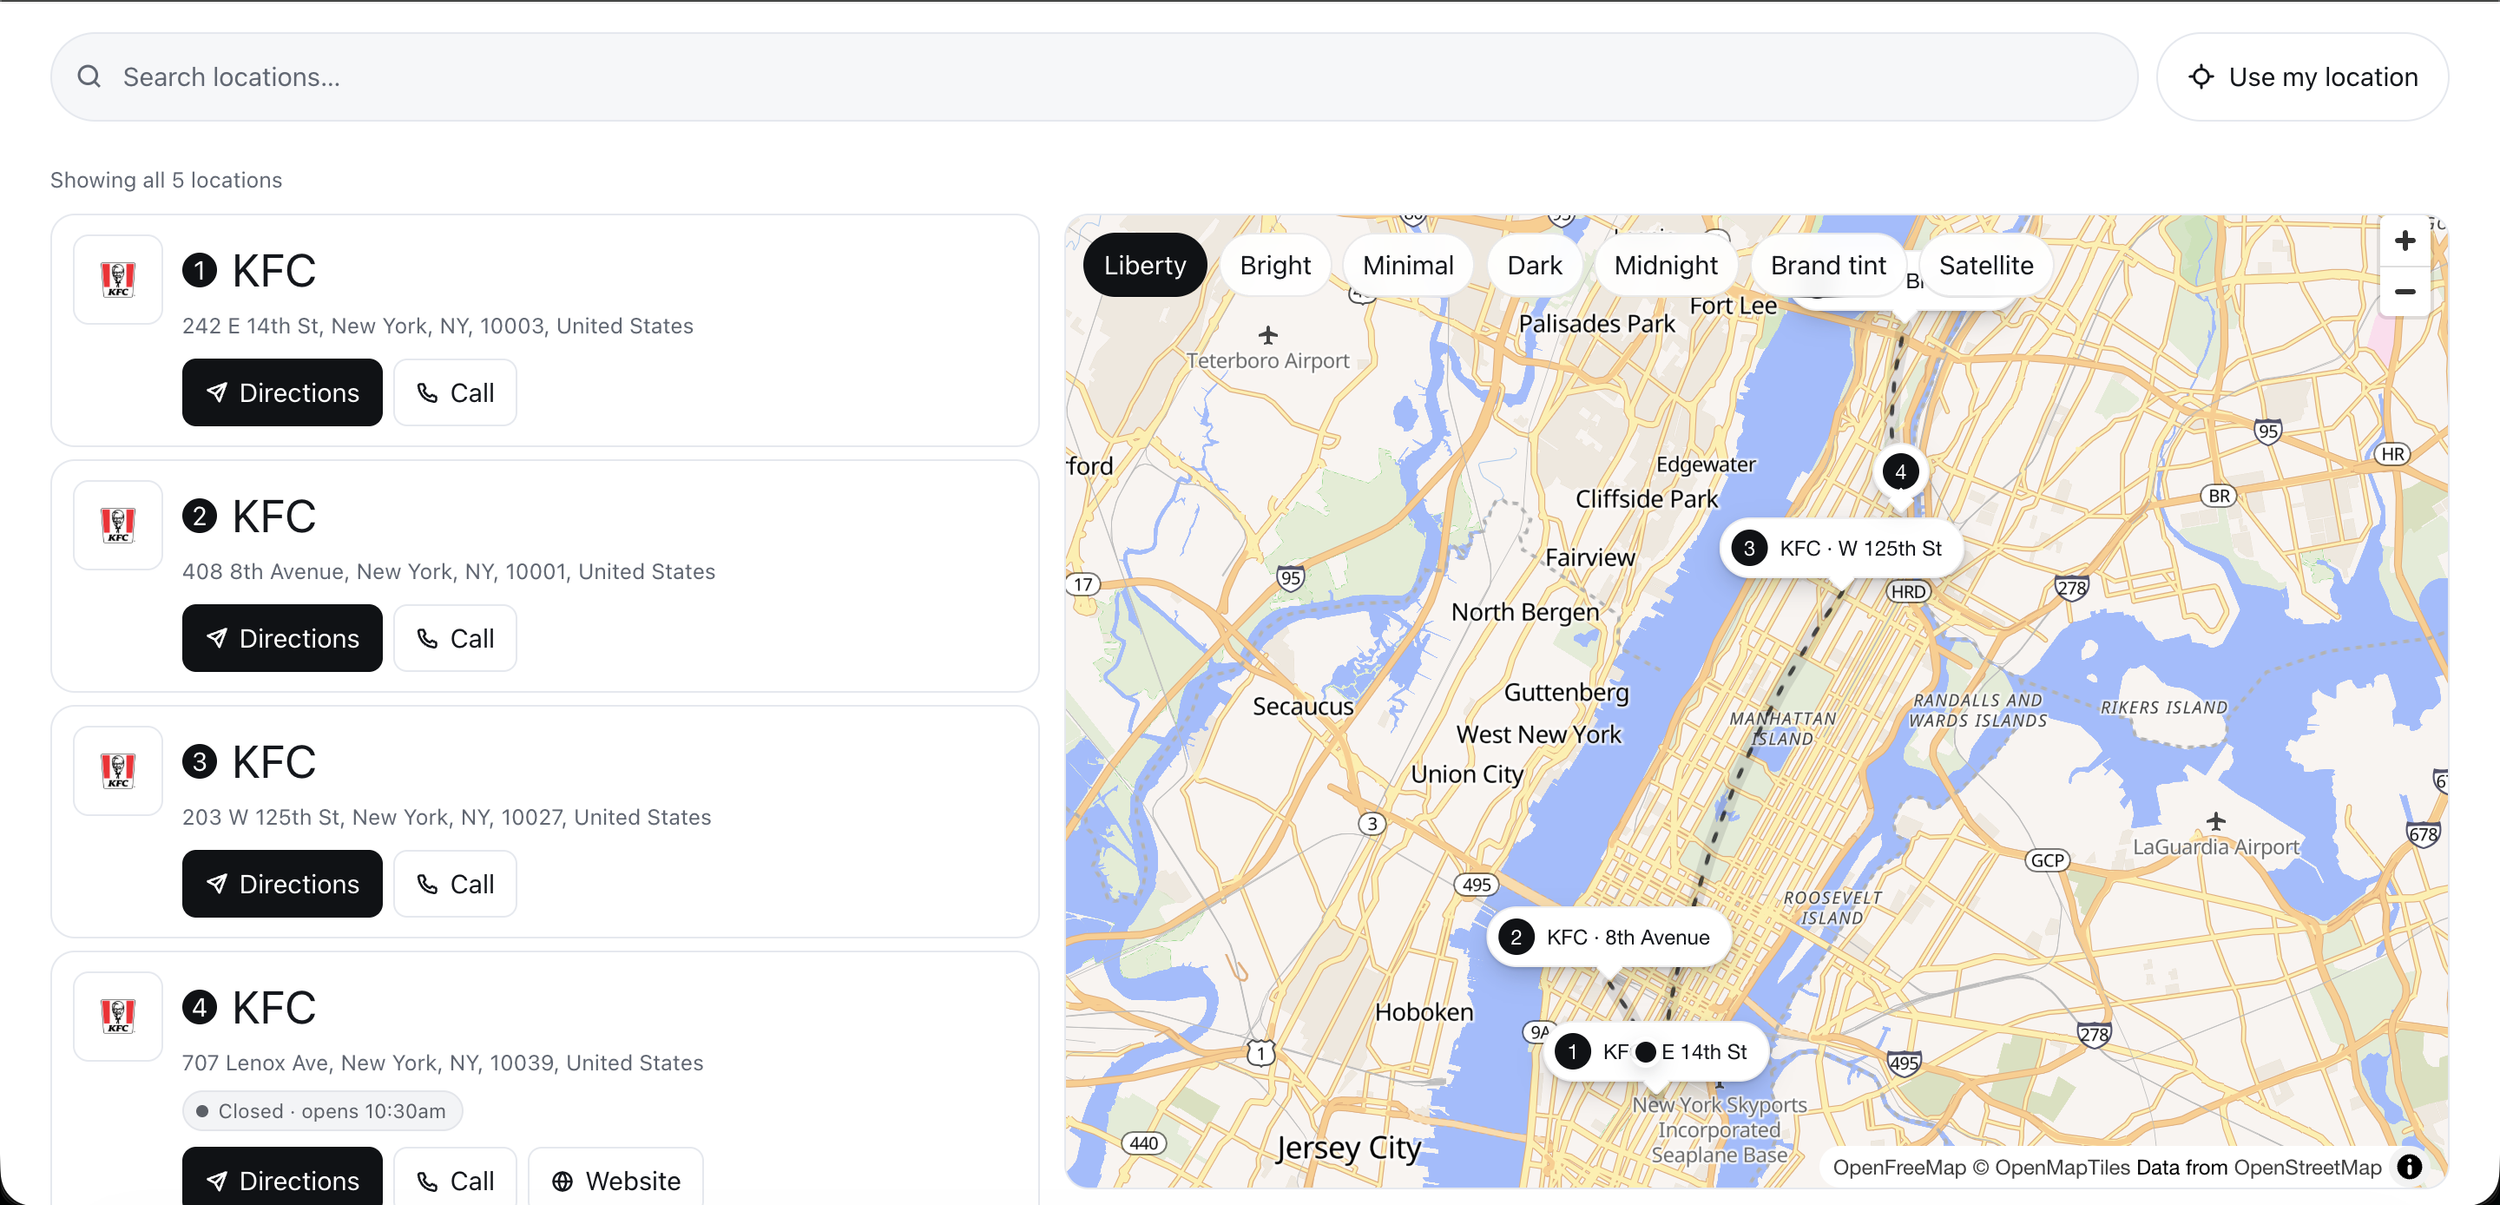
A store locator is more than a map with pins scattered across it. A well-built locator serves as a bridge between your online presence and your physical locations, and it needs to do several things well.
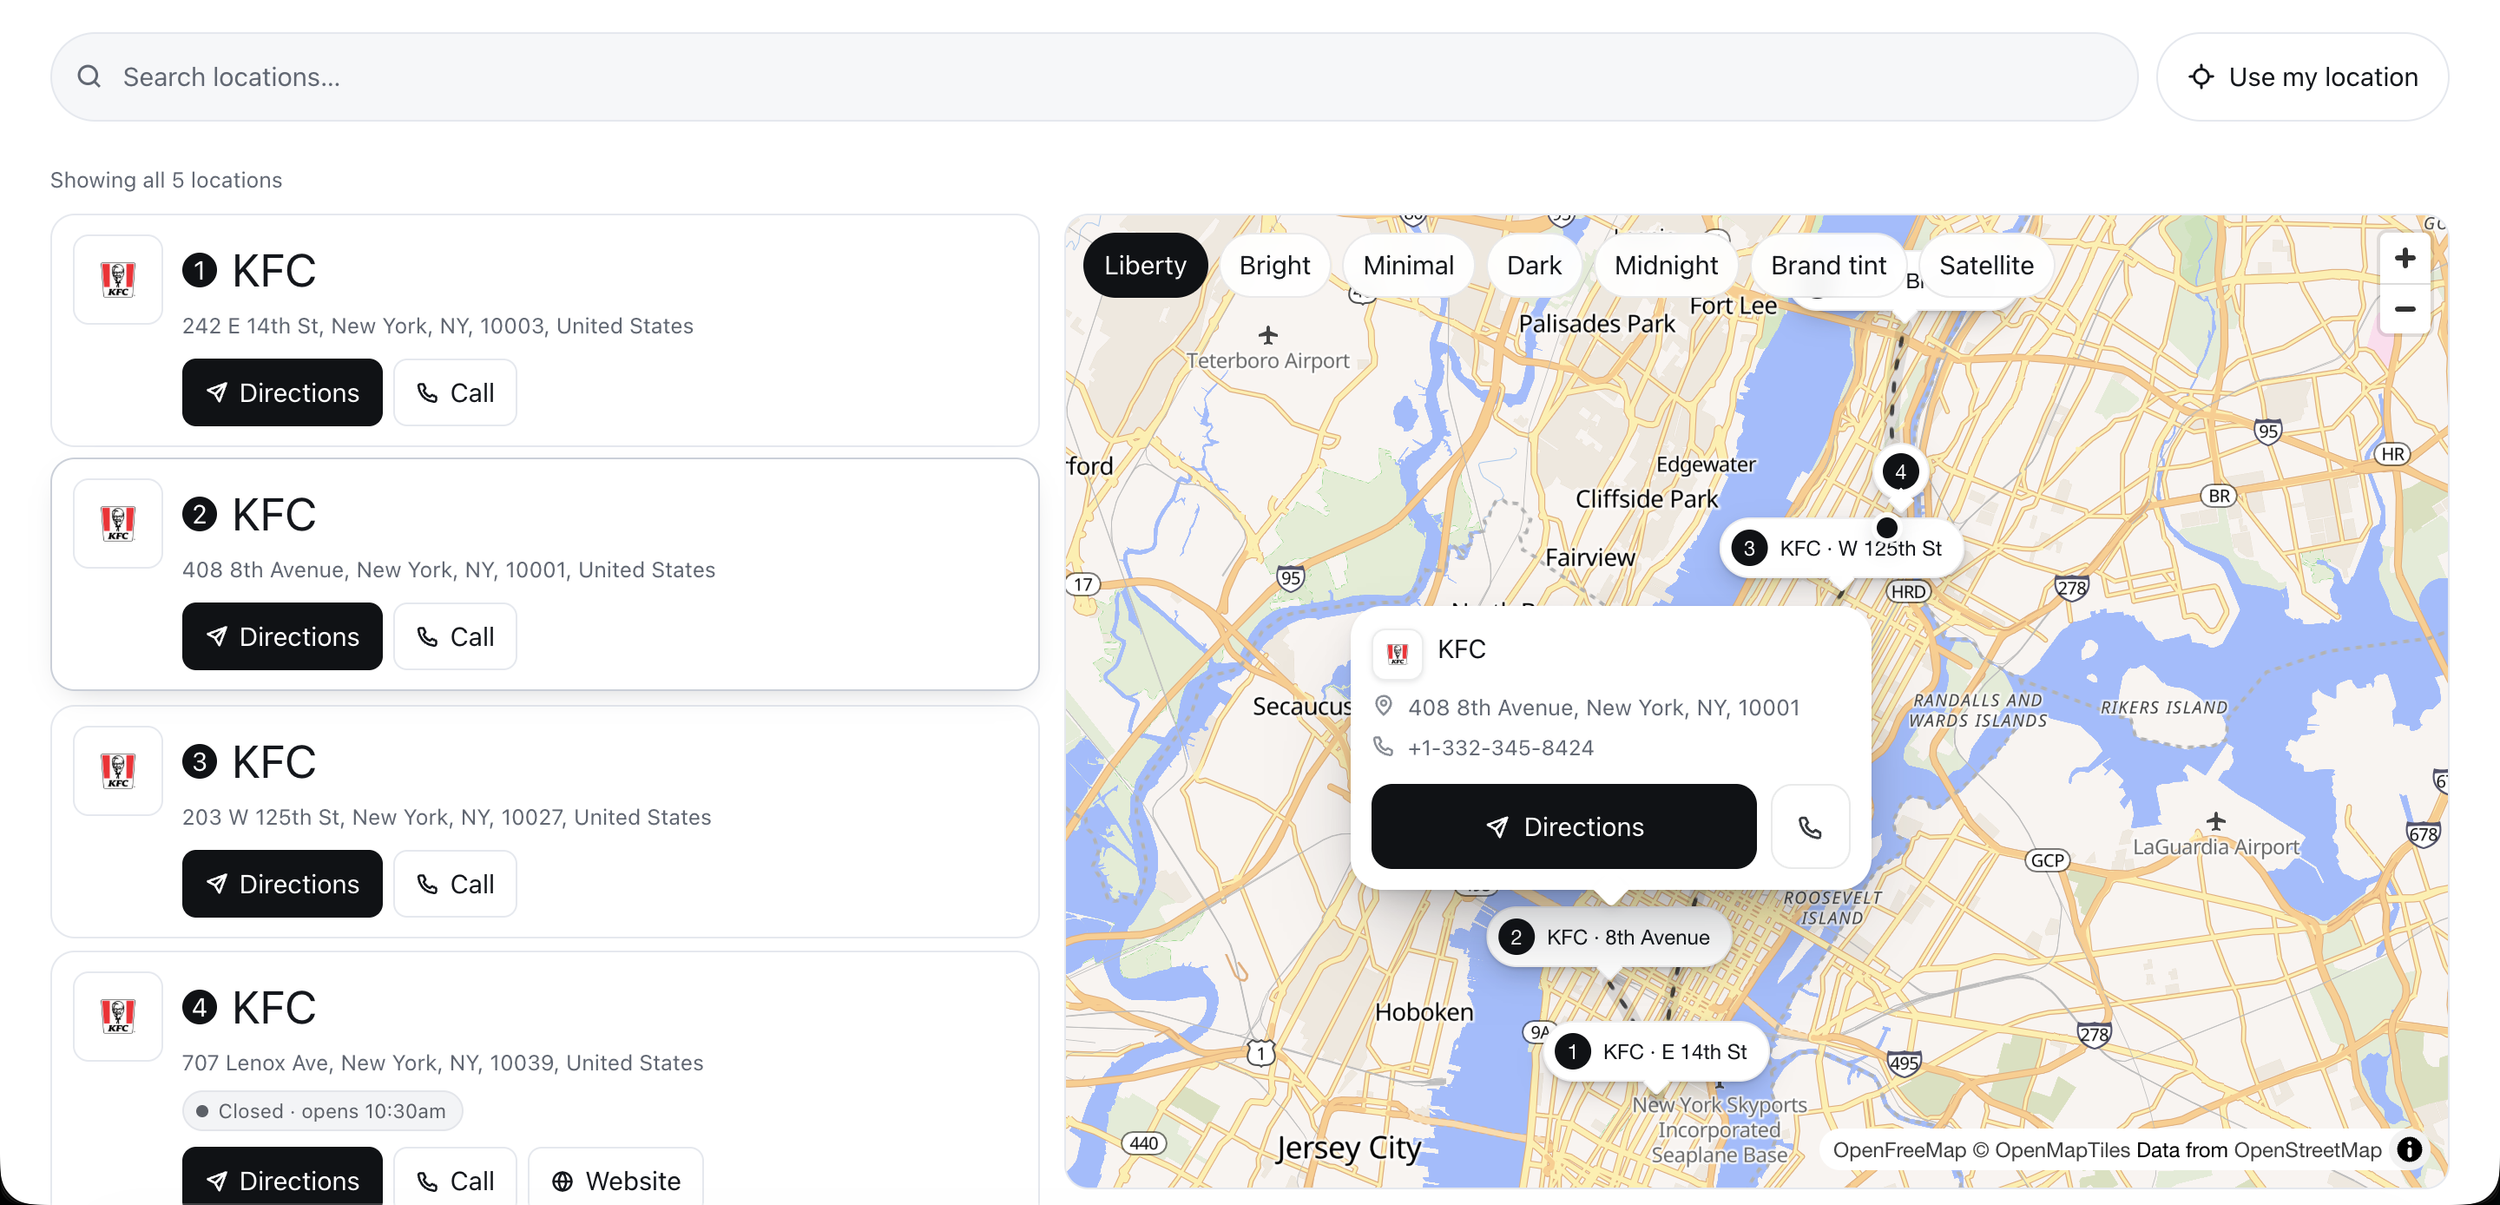
Search by location:
Visitors should be able to enter a city name, postal code, or address and see relevant results. Automatic geolocation (detecting the visitor's current position through their browser) is helpful but shouldn't be the only option, since many users deny location permissions or browse from a different area than where they plan to visit.
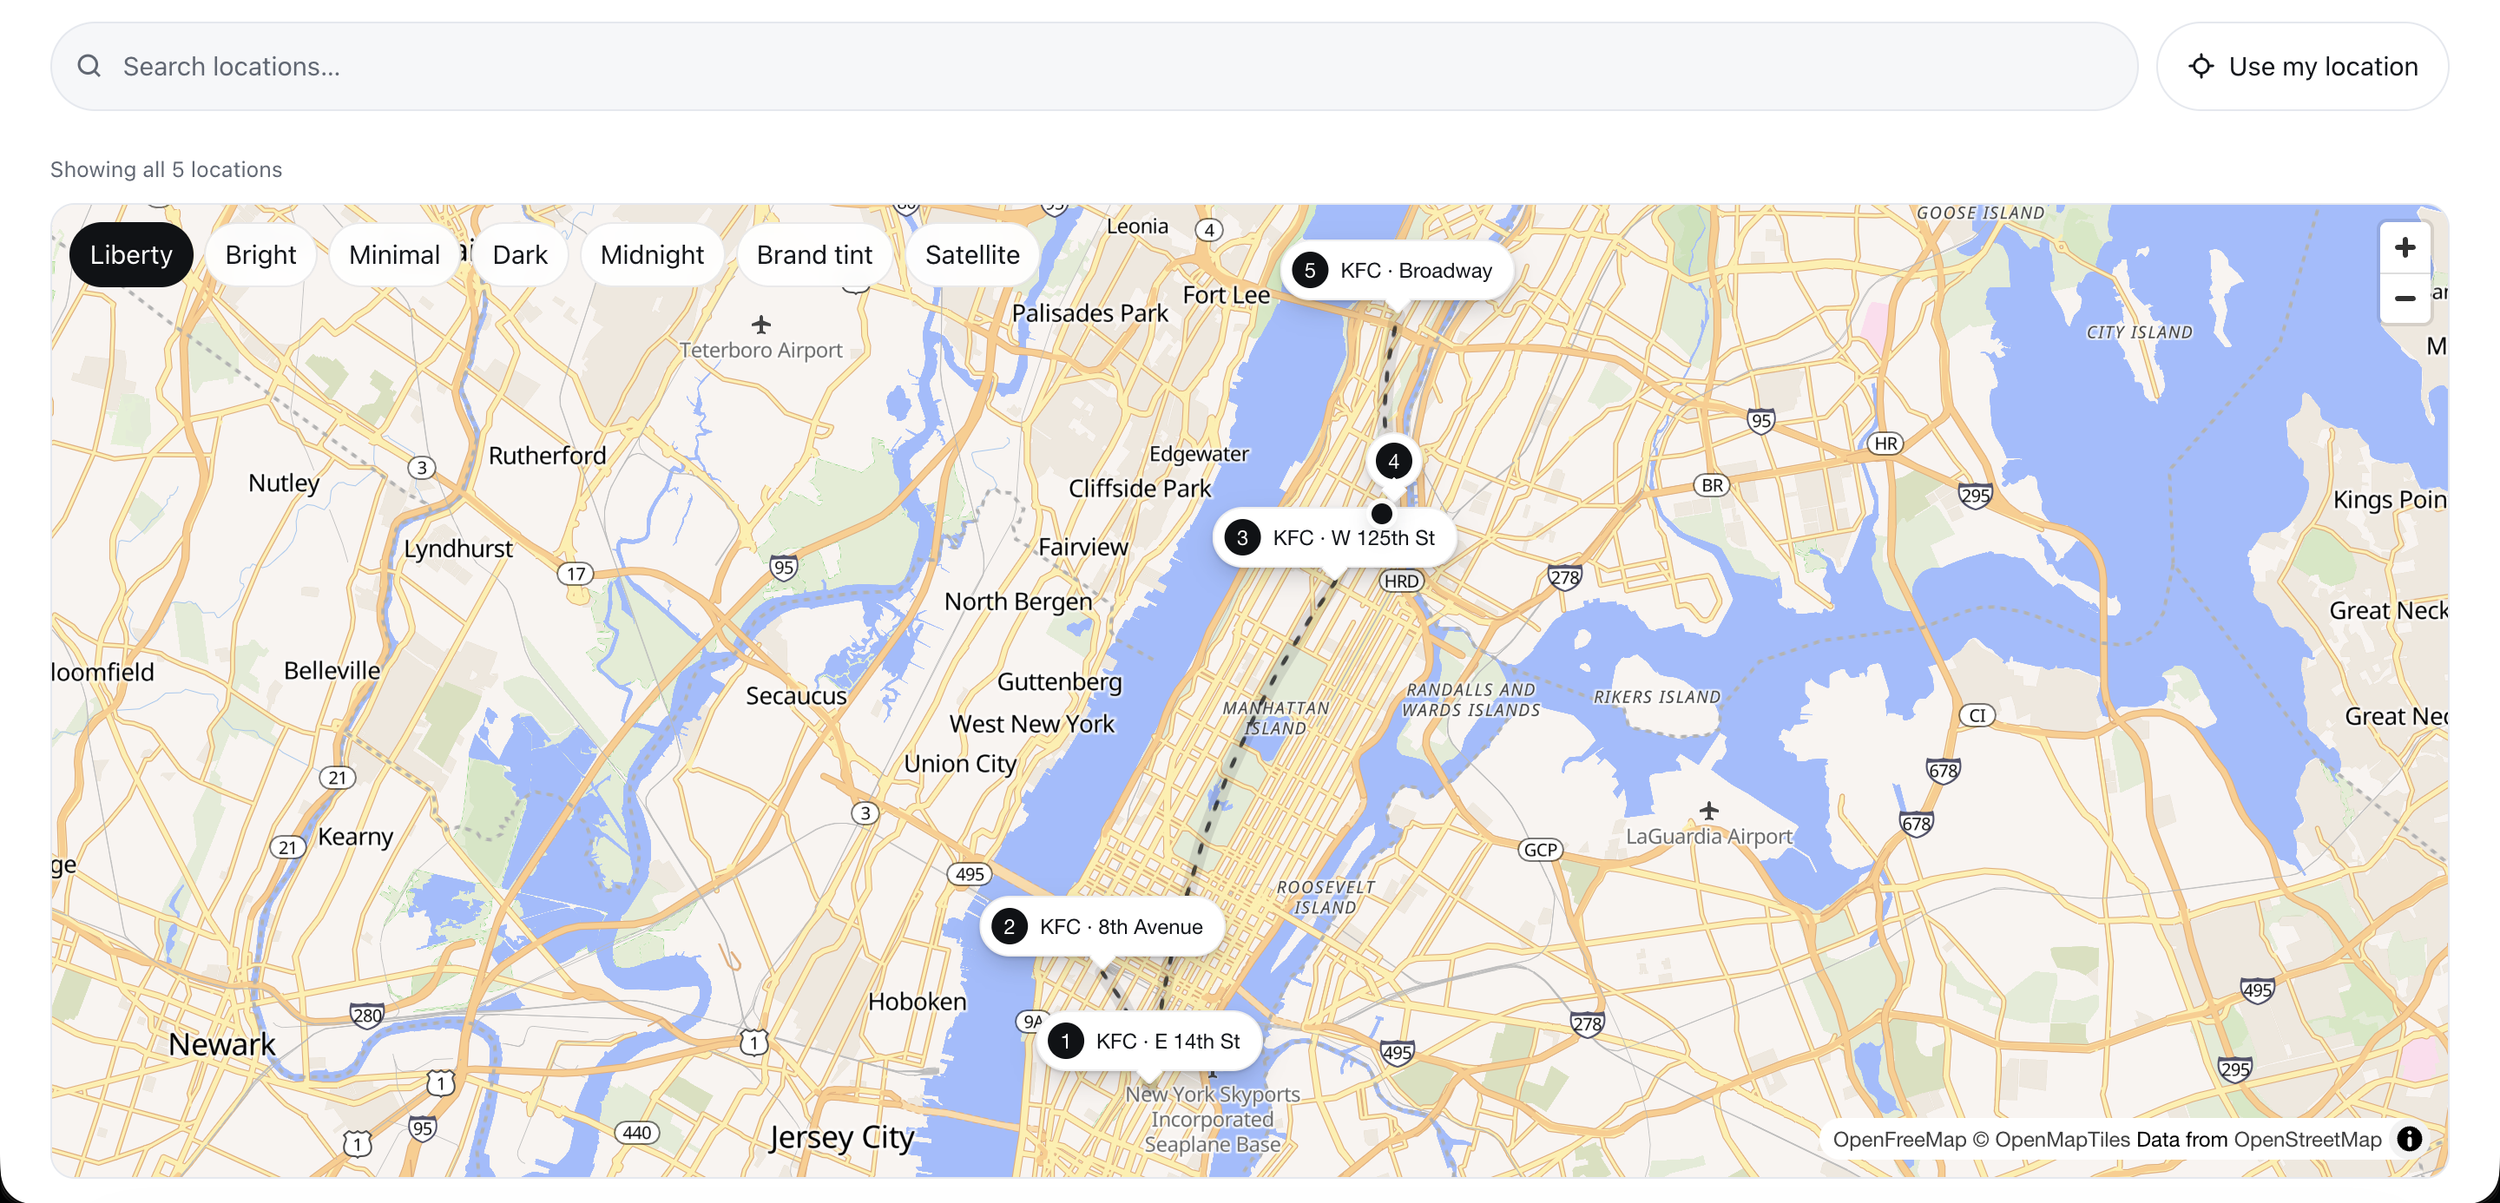
Display a list alongside the map:
A map alone forces users to zoom and pan to find locations visually. A list view beside the map gives visitors scannable results they can browse quickly, especially on mobile devices where map interaction can be awkward.
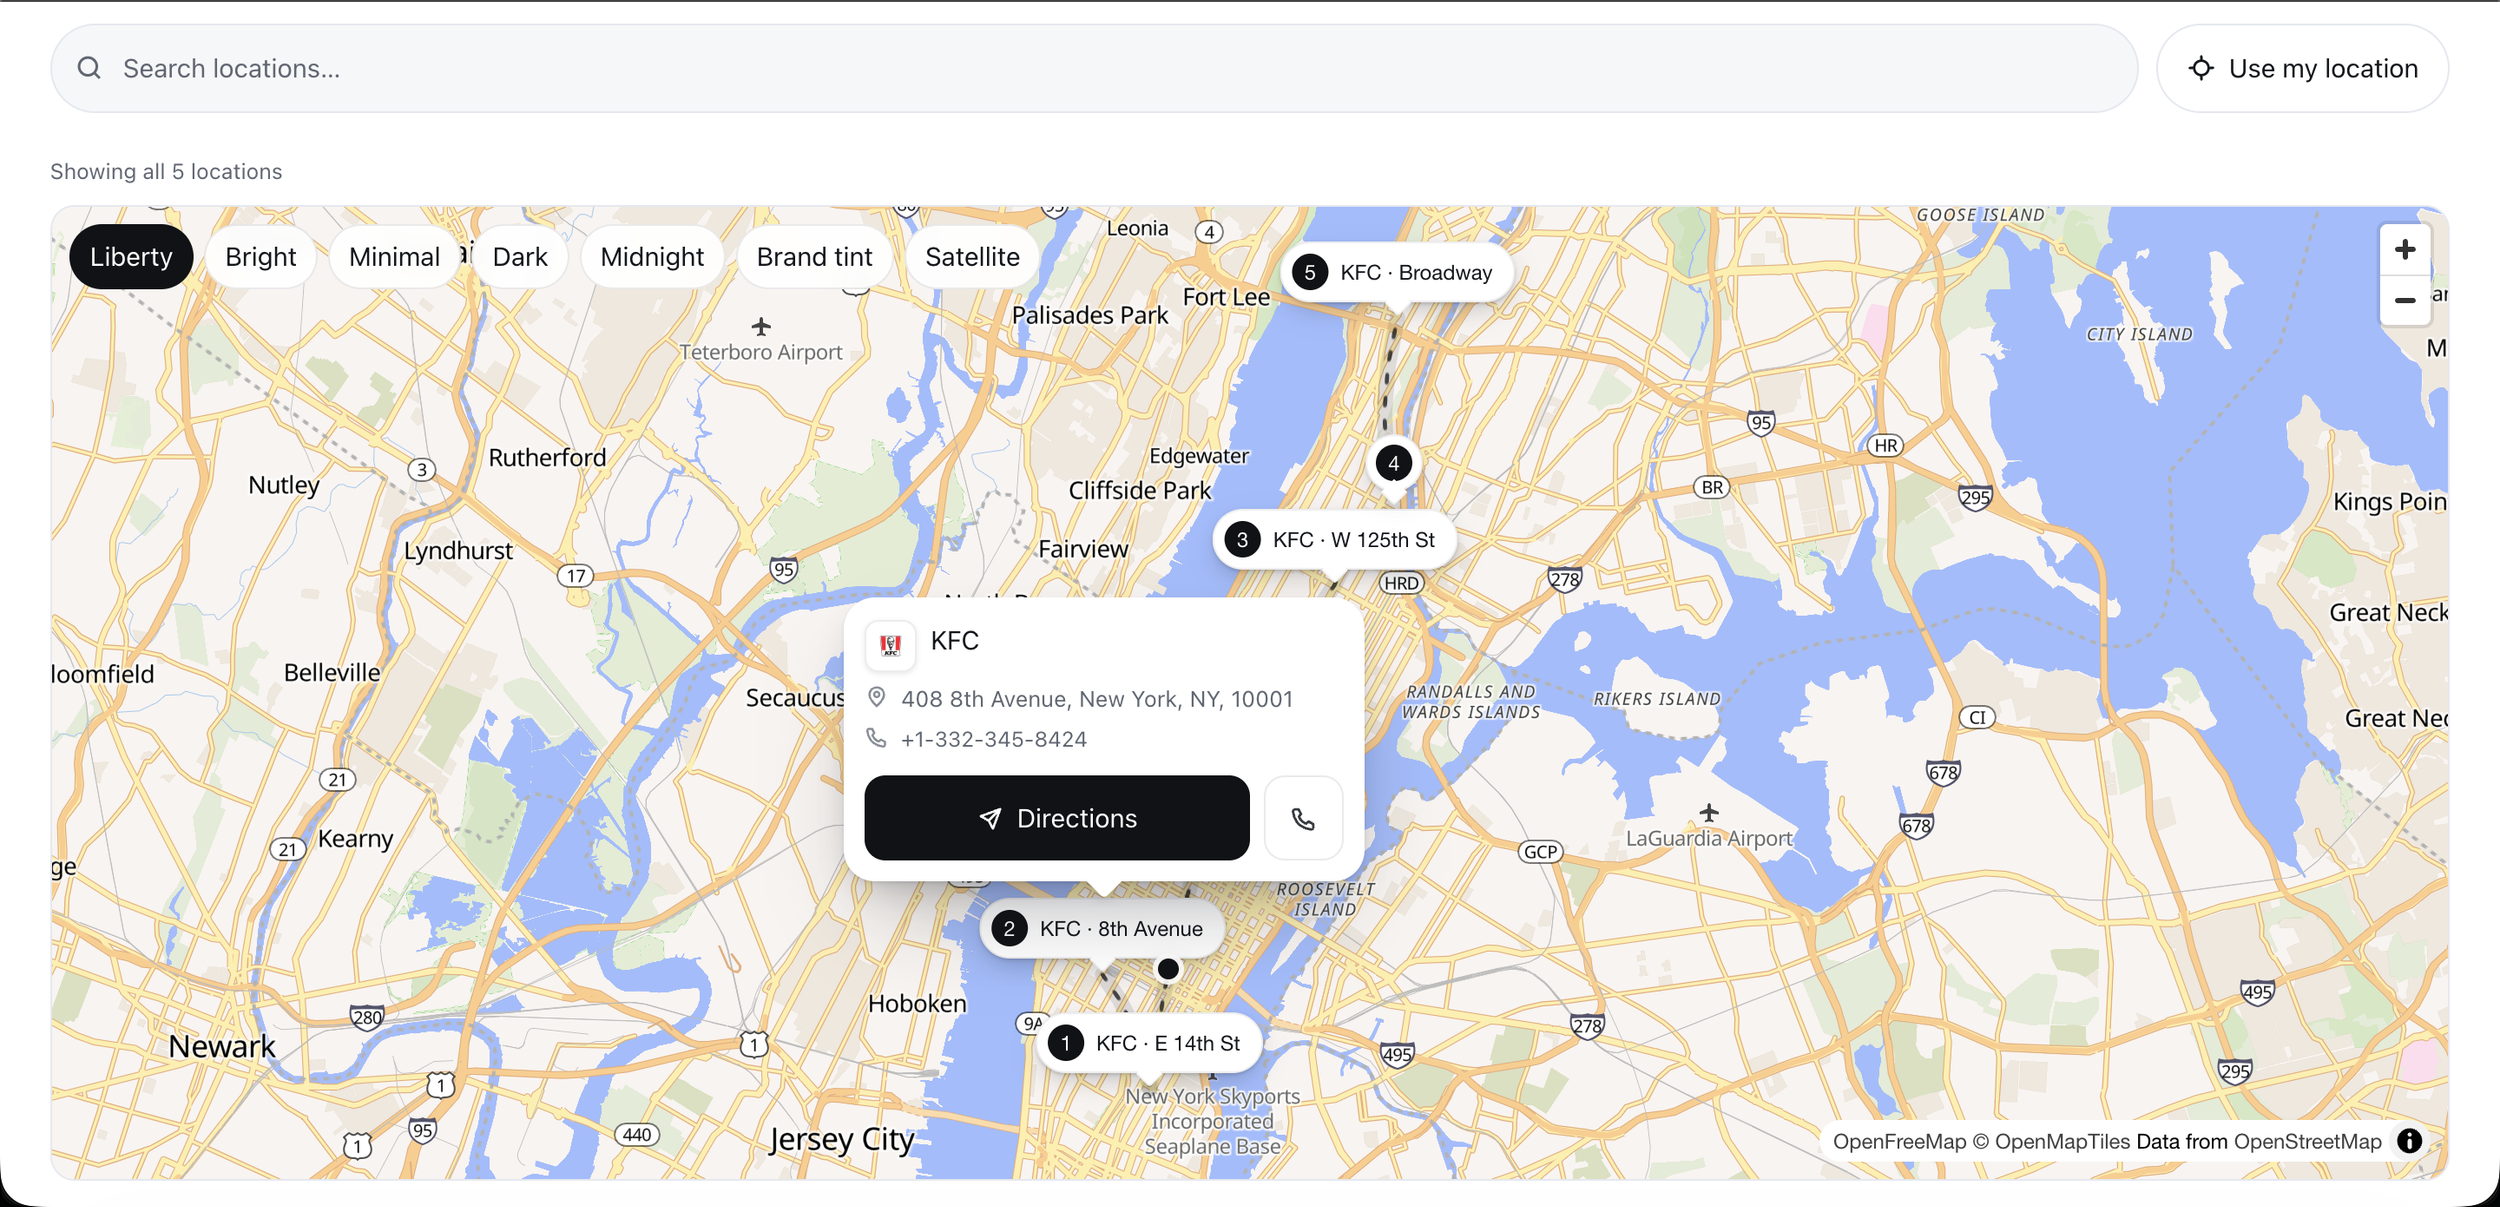
Provide essential details:
Each location entry should include the address, phone number, and business hours at minimum. Depending on your business, you might also want to show available services, photos, or special notes for specific branches.
Offer directions:
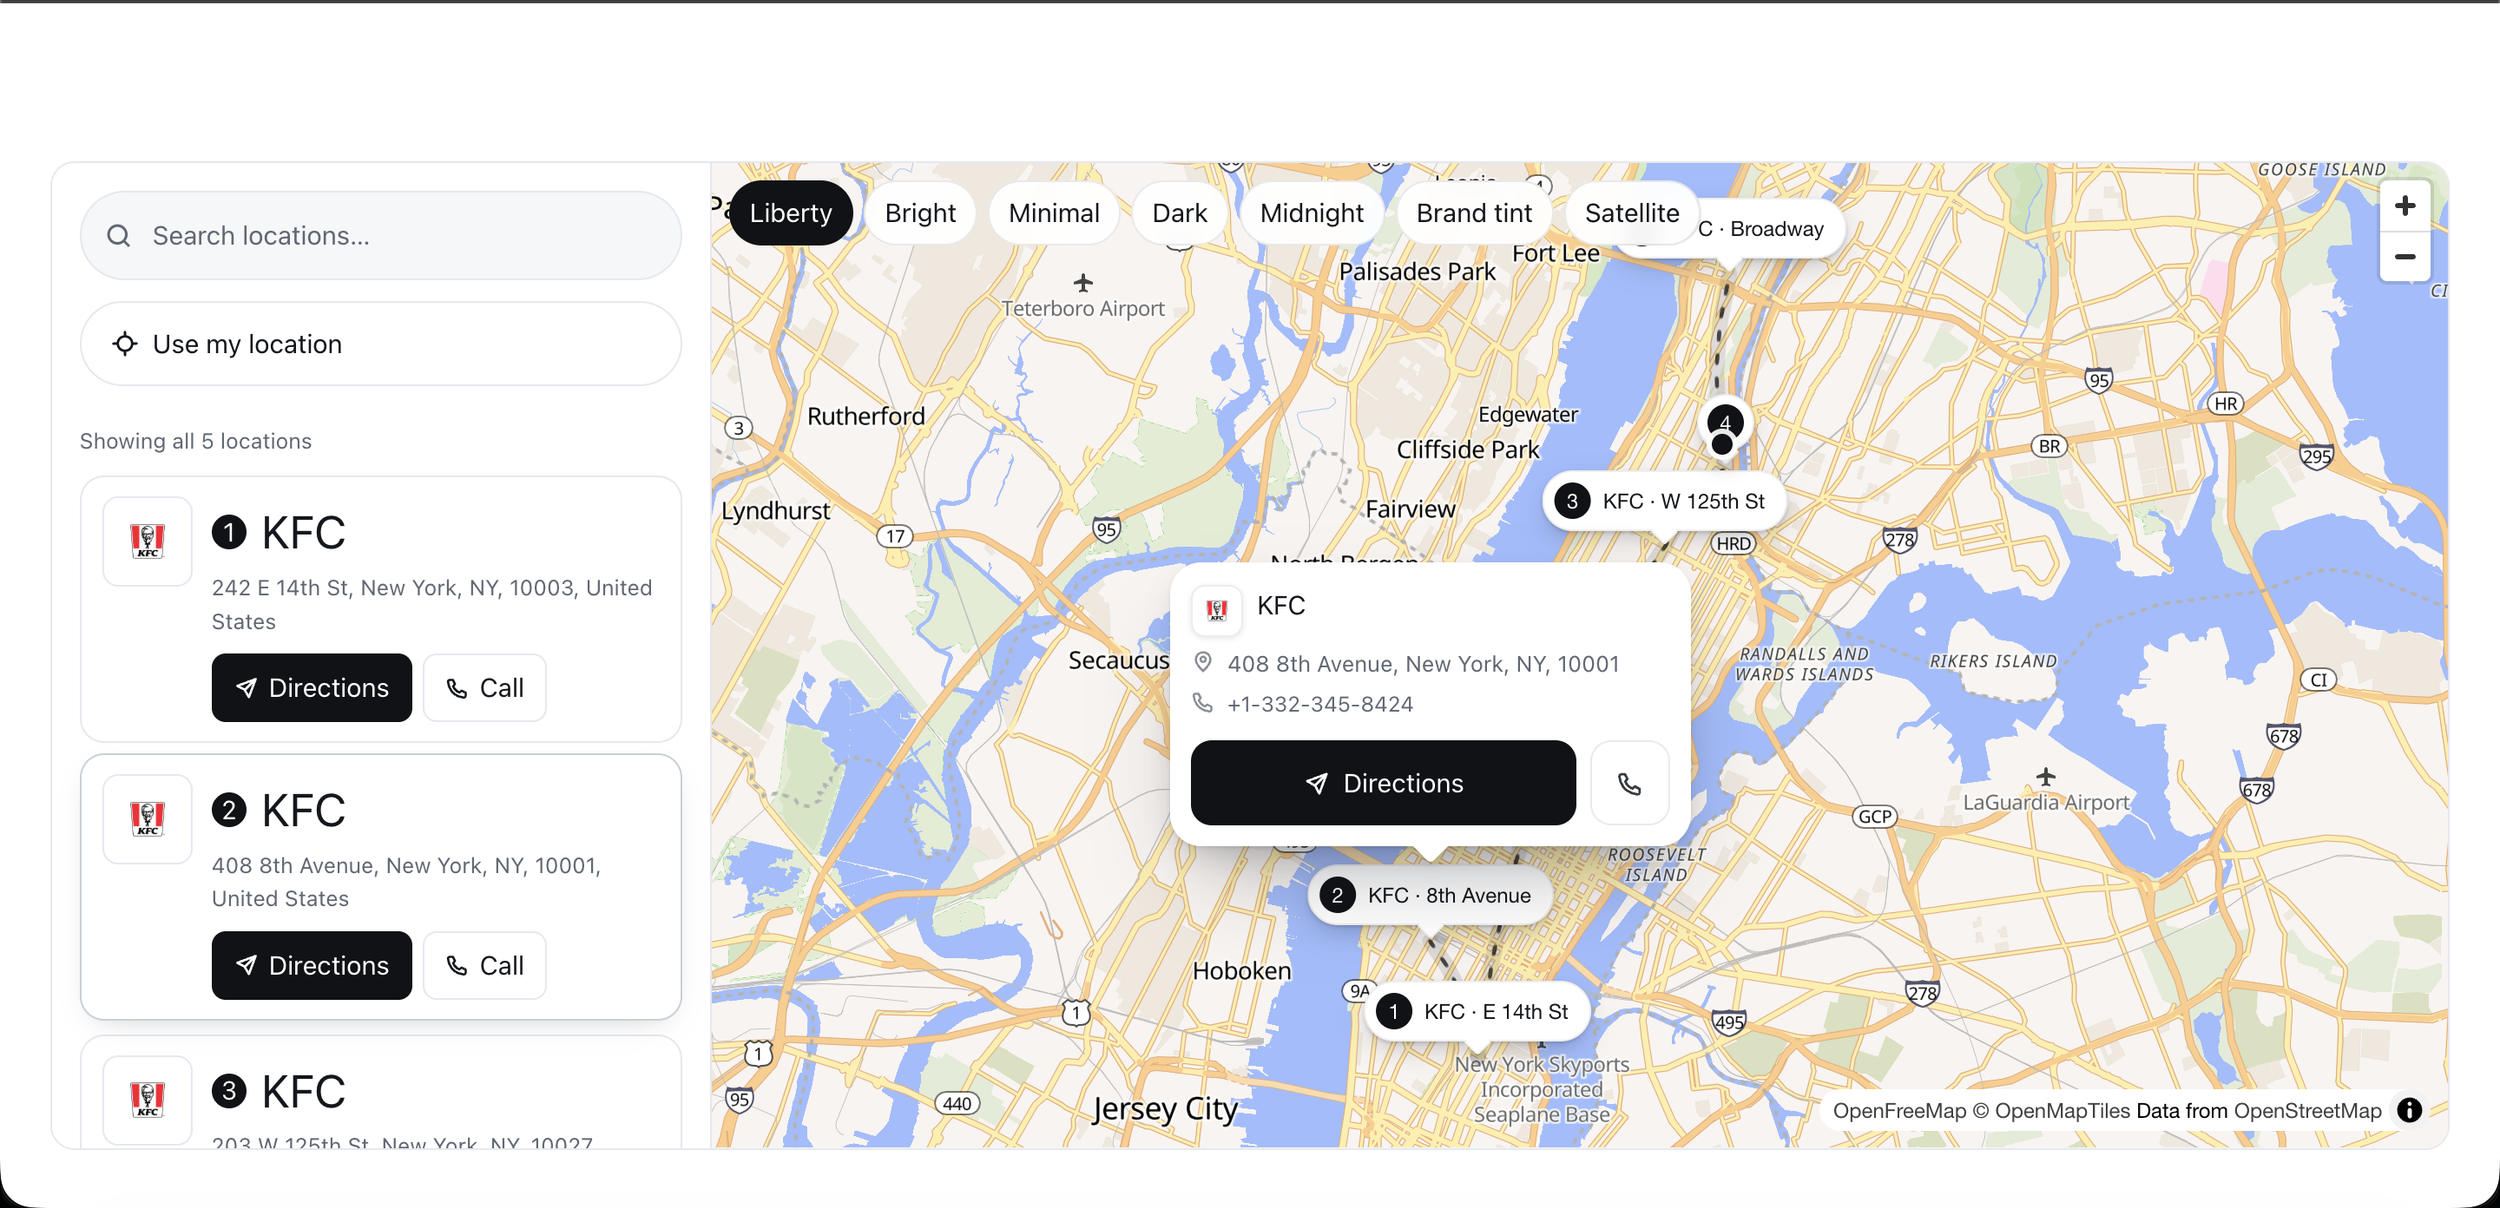
One click should open the visitor's preferred mapping application (Google Maps, Apple Maps, or Waze) with driving directions to that location. This is where the online experience transitions into a real-world visit.
Work on mobile devices:
More than half of local searches happen on phones. A store locator that doesn't work smoothly on a small screen is failing exactly the audience most likely to visit your physical location within hours.
Research from the Nielsen Norman Group found that even though store locator success rates have improved significantly over the years (from 63% to 97%), more than 40% of locator tasks still aren't completed easily. The difference between a locator that works and one that works well is the difference between a frustrated visitor and a new customer walking through your door.
When You Actually Need a Store Locator
Not every business with a physical address needs a store locator. A single-location bakery in Portland probably just needs its address on the contact page, which Squarespace's Map Block handles fine.
You need a store locator when:
You have multiple locations and visitors need to find the closest one
You have dealers, distributors, or stockists carrying your products
You operate a franchise or chain with locations across different areas
You provide services in multiple regions and want visitors to find their local office
Your customers frequently ask "where can I find you near me?"
If any of those situations apply, a location finder isn't a nice-to-have feature. It's a functional requirement. Without one, you're asking visitors to scroll through a page of addresses, or worse, leave your site entirely to search Google Maps for your business name and hope the right locations come up.
The Local Search Connection
Here's a number worth thinking about: 46% of all Google searches have local intent, according to data from BrightLocal. That means nearly half the searches happening on Google right now involve someone looking for something nearby.
The connection to store locators is direct. Google reports that 76% of people who search for a local business on their phone visit a physical location within 24 hours. And 28% of those local searches result in a purchase within a week.
When someone lands on your website from one of those searches, they're already interested. They've already searched, they've already clicked. The only thing standing between that search and a store visit is whether they can quickly find where to go. A store locator removes that last point of friction.
There's also an SEO angle that most Squarespace website owners overlook. A dedicated store locator page creates a natural place to include location-specific content, city names, neighborhood references, and service area descriptions that help your site appear in local search results. It's not about stuffing keywords onto a page. It's about giving search engines genuine, useful location information that matches what people are searching for.
What to Look for in a Squarespace Store Locator Plugin
The market for Squarespace store locator tools includes dozens of options. Some are built specifically for Squarespace, while others are general-purpose widgets that happen to work with the platform. Before choosing one, there are several things worth evaluating.
Ease of Setup
Squarespace users choose the platform because they don't want to deal with complex technical configuration. A store locator plugin should match that philosophy. Look for tools that work through Squarespace's Code Block feature, which lets you paste a snippet of code into any page without modifying your site's template files.
Avoid solutions that require you to register for third-party API keys (such as Google Maps API keys), especially if you're not comfortable with developer consoles and billing configurations. Some solutions handle all of this behind the scenes so you don't have to.
Compatibility
Make sure the plugin works with your specific Squarespace version. Most Squarespace sites today run on version 7.1, but some older sites still use version 7.0. The plugin you choose should support both.
Also check whether your Squarespace plan supports custom code injection. On certain lower-tier plans, Code Blocks may not be available, which would prevent you from embedding any third-party plugin.
Pricing Model
This is where the options diverge significantly. Most SaaS store locator tools charge monthly subscriptions, typically starting between $25 and $50 per month. Over a year, that adds up to $300 to $600, and the cost continues as long as you use the tool.
A few alternatives offer one-time pricing, where you pay once and use the tool indefinitely without recurring fees. For small businesses and solo website owners, the difference in total cost over two or three years can be substantial.
Neither model is inherently better. Monthly subscriptions sometimes include ongoing updates, hosting, and support. One-time purchases may require you to manage updates differently. The right choice depends on your budget and how you prefer to pay for tools.
Customization
Your store locator should look like it belongs on your website. If your Squarespace site uses a minimal, modern design and the locator looks like it was imported from 2012, visitors will notice the disconnect.
Look for options that let you adjust colors, fonts, map styles, and layout to match your site's visual identity. Some tools offer pre-built themes. Others give you full control through a visual builder.
Location Management
Adding your first ten locations is easy with almost any tool. The real question is how you manage those locations over time. Consider how the plugin handles:
Adding new locations
Editing existing location details
Bulk importing locations from a spreadsheet
Organizing locations by category or region
Keeping information up to date across your team
If your business is growing and adding new locations regularly, smooth location management becomes just as important as the customer-facing map.
How Locator Pro Works on Squarespace
Locator Pro is a store locator plugin built specifically for Squarespace websites. It takes a different approach from most alternatives in the market, both in how it works and how it's priced.
The Setup Process
You need two things:
The builder file: locator-pro-builder.html, included with your purchase.
A Squarespace site": on 7.1 or 7.0, with the ability to add a Code Block.
Code Blocks need a paid Squarespace plan: Any Business or Commerce plan includes them. Personal plans do not. If you can't add a Code Block, that's why.
Have your location list ready names, street addresses, phone numbers. A spreadsheet works nicely, but you can also type them in one at a time.
1- Open the builder
Double-click locator-pro-builder.html: It opens in your normal browser.
Nothing to install, no account, no login. The file runs entirely on your own computer.
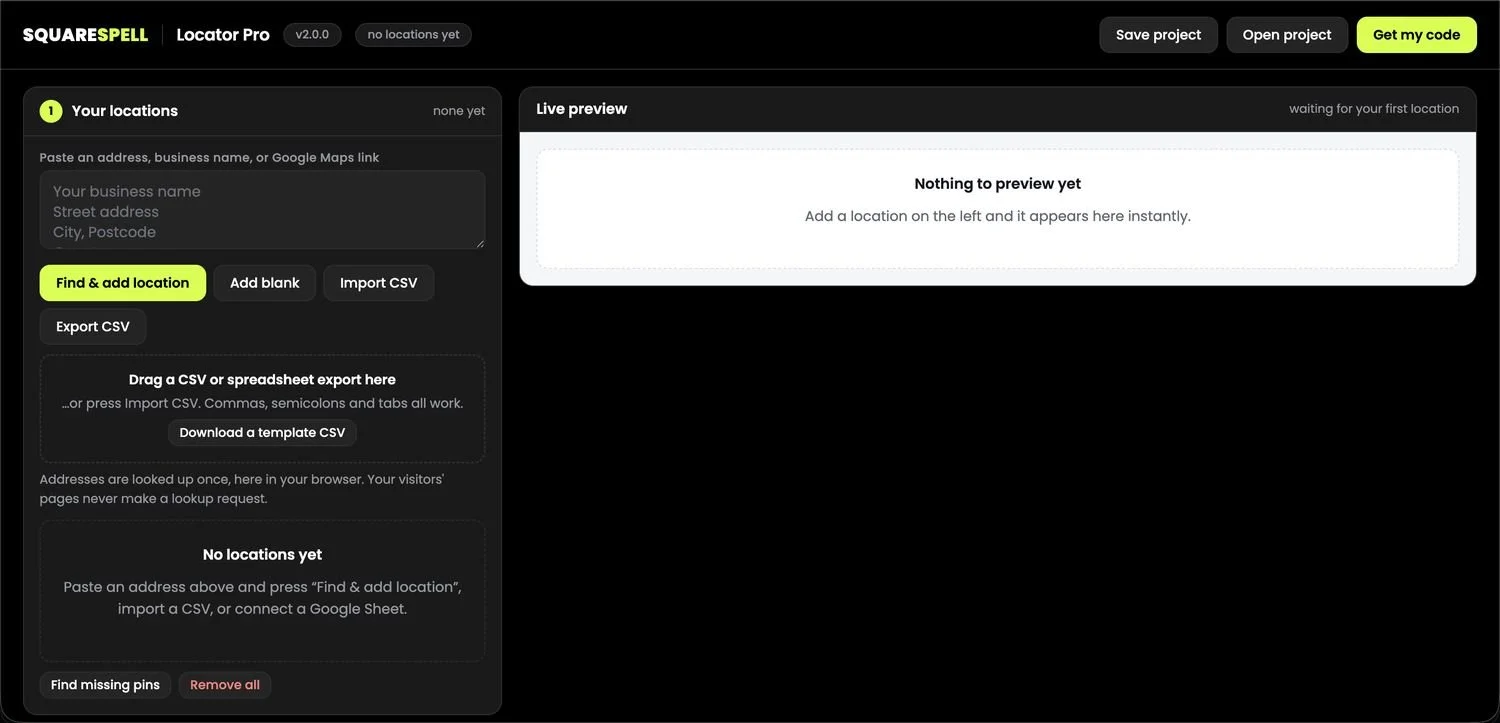
This is what you see first. Everything you build appears in the Live preview on the right, exactly as your visitors will see it.
Left side
Where you enter everything locations, branding, layout, wording.
Right side
The live preview. It updates the moment you type.
Top bar
Save project, Open project, and Get my code when you're finished.
2- Add your locations
There are three ways. Pick whichever suits you.
Option A Paste an address
Easiest for a few locations:Type or paste into the big box, then press Find & add location.
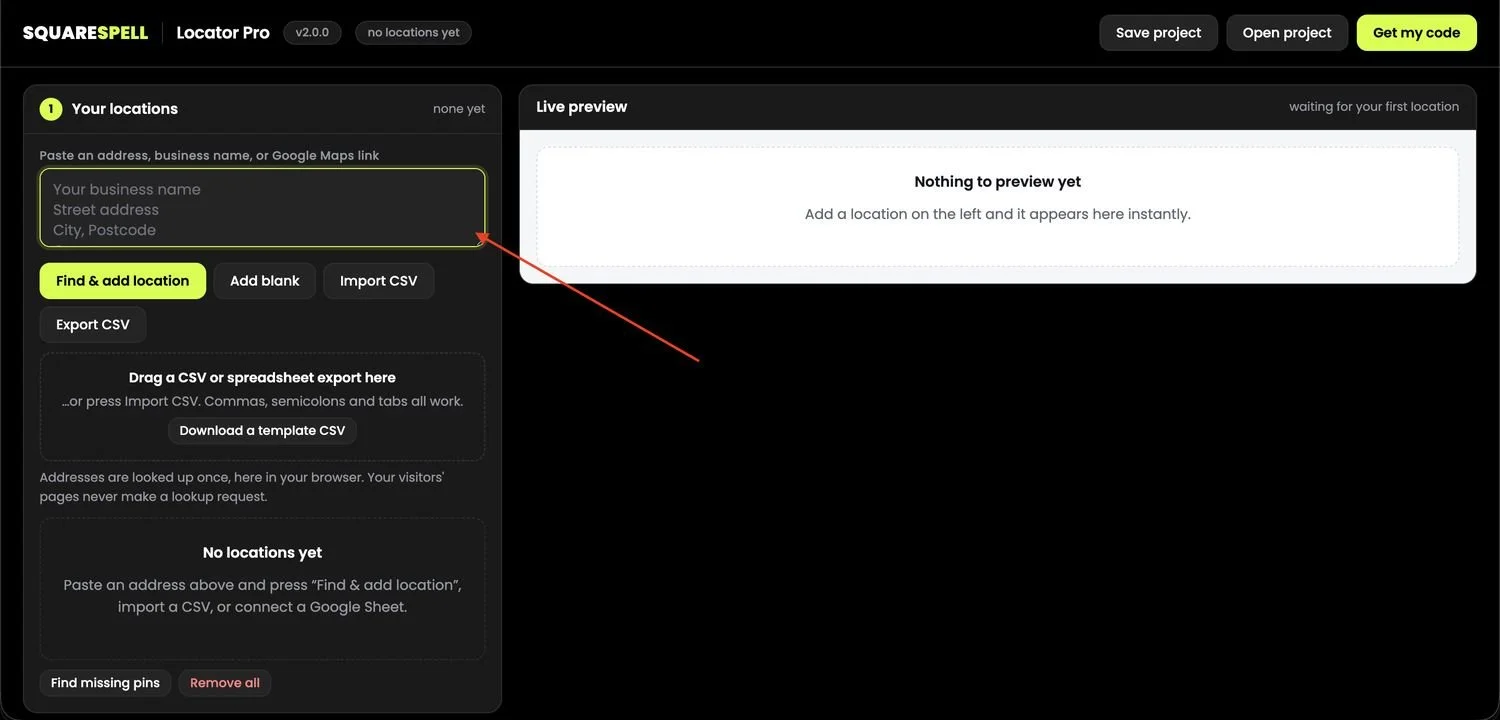
Put the business name on the first line, then the street, then city and postcode.
The builder finds the map pin for you automatically. You can also paste a Google Maps link and it will pull the coordinates straight out of it.
Addresses are looked up once, here: Your visitors' pages never make a lookup request the coordinates are baked into your code, so the map loads instantly for them.
Option B: Import a CSV
best for 10+ locations
Press Import CSV, or drag your spreadsheet export onto the dashed box.
Commas, semicolons and tabs all work European Excel exports are handled.
Column names are matched loosely: Business Name, Store Name, Street Address, Town/City, Post Code, Zip and more.
Press Download a template CSV to get a correctly-formed file to fill in.
If an import fails, a red panel appears listing every column heading it found and which delimiter it used. Rename one column to Name or Address and try again.
Option C: Connect a live Google Sheet
updates without new code
In section 3, paste a published Google Sheet link. In Sheets: File → Share → Publish to web.
Your locator then reads the sheet on every page load. Edit the sheet, the map updates no need to regenerate or re-paste anything. Your typed locations stay embedded as a fallback in case the sheet is ever unreachable.
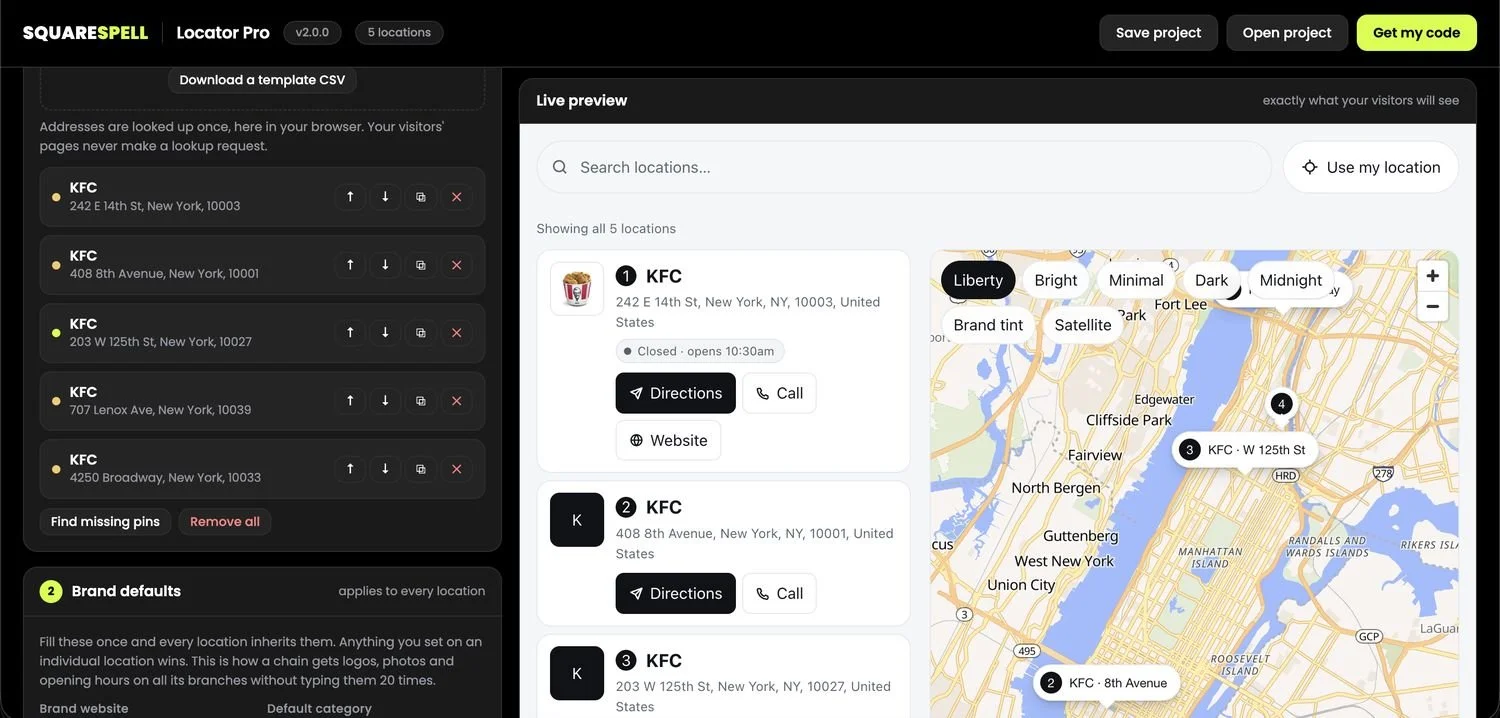
Five locations added. Each one appears in the list on the left and in the preview on the right straight away.
3- Fill in each location's details
Click any location in the list to open it. Fill in as much or as little as you like only the name and address are required.
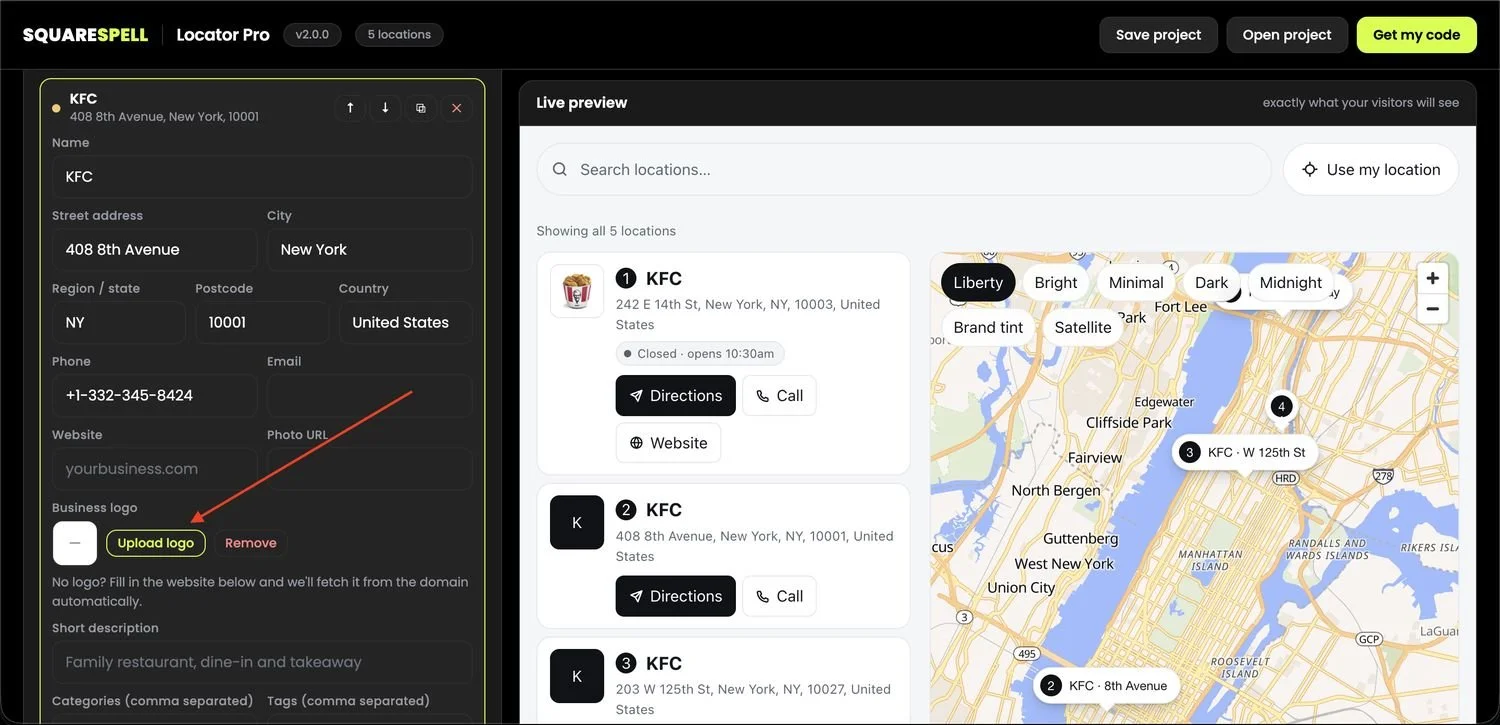
Click a location to expand it. The Upload logo button is arrowed.
| Field | What it does |
|---|---|
| Name | Shown on the card and on the map pin. |
| Street address, City, Region, Postcode, Country | Shown on the card and used for the Directions link. |
| Phone | Adds a Call button. Taps to dial on a phone. |
| Adds an email button. | |
| Website | Adds a Website button — and the logo is fetched from this domain automatically. |
| Photo URL | A storefront photo. Shown on the card and in the hover widget. |
| Business logo | Upload an image file. Overrides the automatic one. |
| Short description | One line under the name, e.g. "Family restaurant, dine-in and takeaway". |
| Categories | Comma separated. These become the filter buttons visitors can click. |
| Tags | Comma separated. Searchable, but not shown as filters. |
| Extra button | A custom call-to-action, e.g. "Book a table" linking to your booking page. |
| Time zone | Optional, e.g. Europe/London. Makes Open/Closed correct for that branch. |
| Opening hours | Per day. Type 9-17, 10:30-23:00, or closed. |
Two ways to get a logo
Upload one: Press Upload logo and choose a file. It's automatically shrunk to 128px and embedded in your code, so there's nothing to host and no link that can break.
Or just fill in the Website field: The logo is fetched from the domain automatically. You don't have to upload anything.
If you do neither, the pin shows the business's initials in your brand colour.
Reordering and tidying
Every location row has four buttons:
↑ ↓ move it up or down (this sets the numbering visitors see)
⧉ duplicate it handy for branches that share most details
✕ remove it
Find missing pins looks up any location that doesn't have a map position yet. Remove all clears the list and asks first.
4- Brand defaults the big time saver
If all your locations belong to one business, fill this in once and every branch inherits it. This is the difference between a bare list and a finished-looking locator.
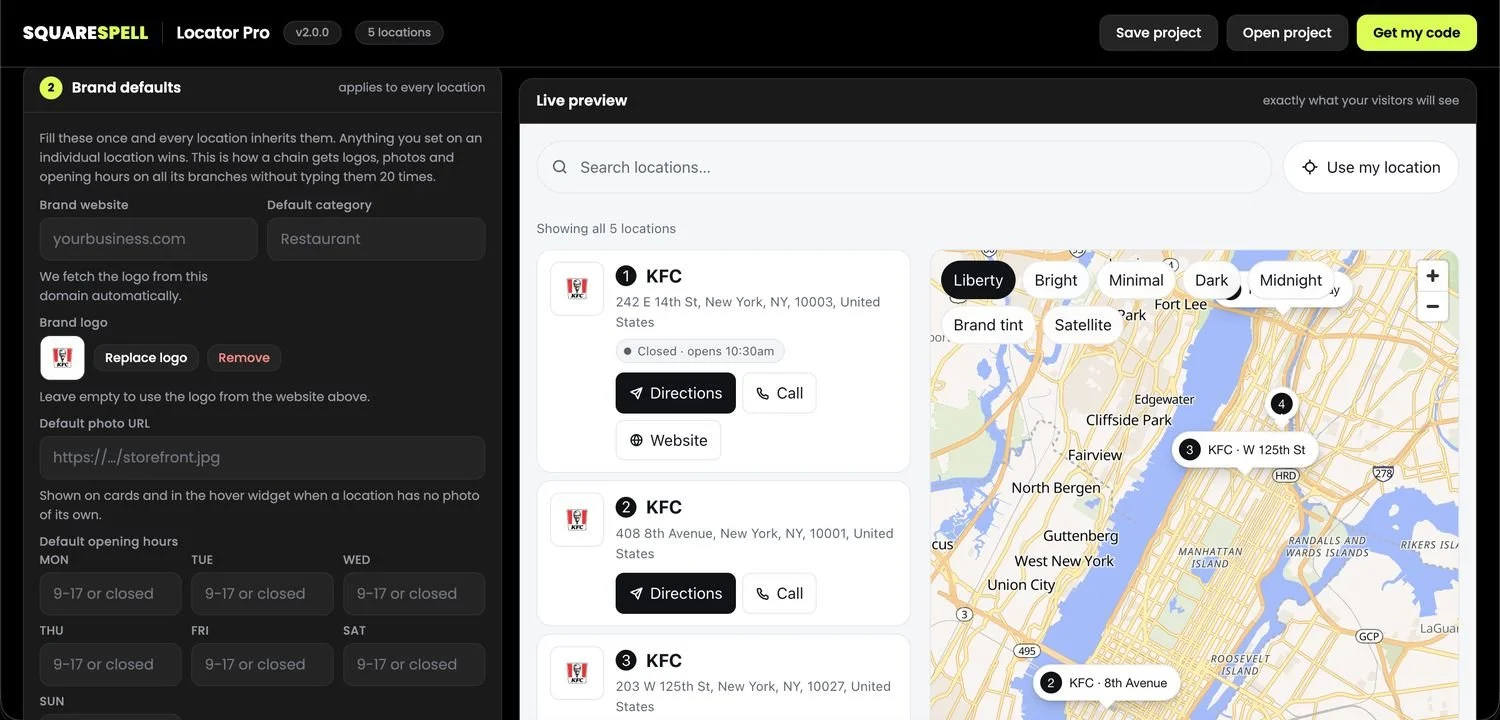
Fill these once. Anything you set on an individual location always wins.
| Field | Why it matters |
|---|---|
| Brand website | The logo for every location is fetched from this domain. |
| Default category | Gives every branch a category so filters work. |
| Brand logo | Upload once, used everywhere. Overrides the website derived one. |
| Default photo URL | Shown on cards and in the hover widget for branches with no photo of their own. |
| Default opening hours | Gives every branch a live Open / Closed badge. |
Don't skip this. A twelve-branch chain filling this in once gets logos, photos and live opening status on all twelve — instead of typing the same thing twelve times.
5- Choose your map style
Seven styles. Click one and the preview changes instantly.
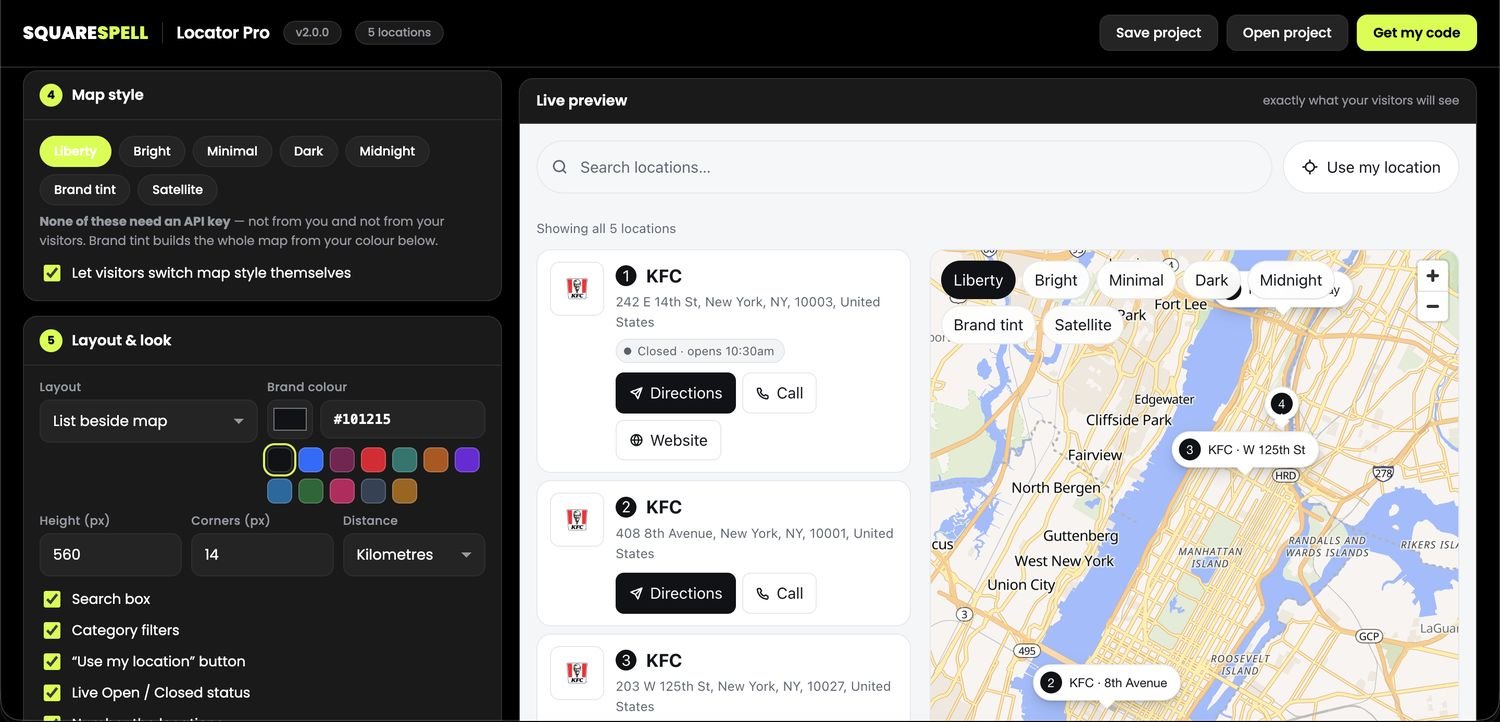
Every style works without an API key not from you, and not from your visitors.
| Style | Best for |
|---|---|
| Liberty | The default. Clean and colourful, closest to what people expect from a map. |
| Bright | More colour and more points of interest. |
| Minimal | Pale and quiet, so your pins and brand colour dominate. |
| Dark | Dark websites. The route and controls invert automatically. |
| Midnight | A deeper, cooler dark. |
| Brand tint | The whole map is generated from your brand colour. |
| Satellite | Aerial imagery with street and place names on top. |
Let visitors switch map style themselves: Leave this ticked and the style buttons appear on your live map. Untick it to lock your chosen style.
6- Layout & look
Everything about how the locator looks lives in section 5 of the builder.
Layout
List beside map: The standard block. Sits inside your page.
Full-screen experience: A taller, immersive panel with the list on the left.
List only: No map.
Map only: no list.
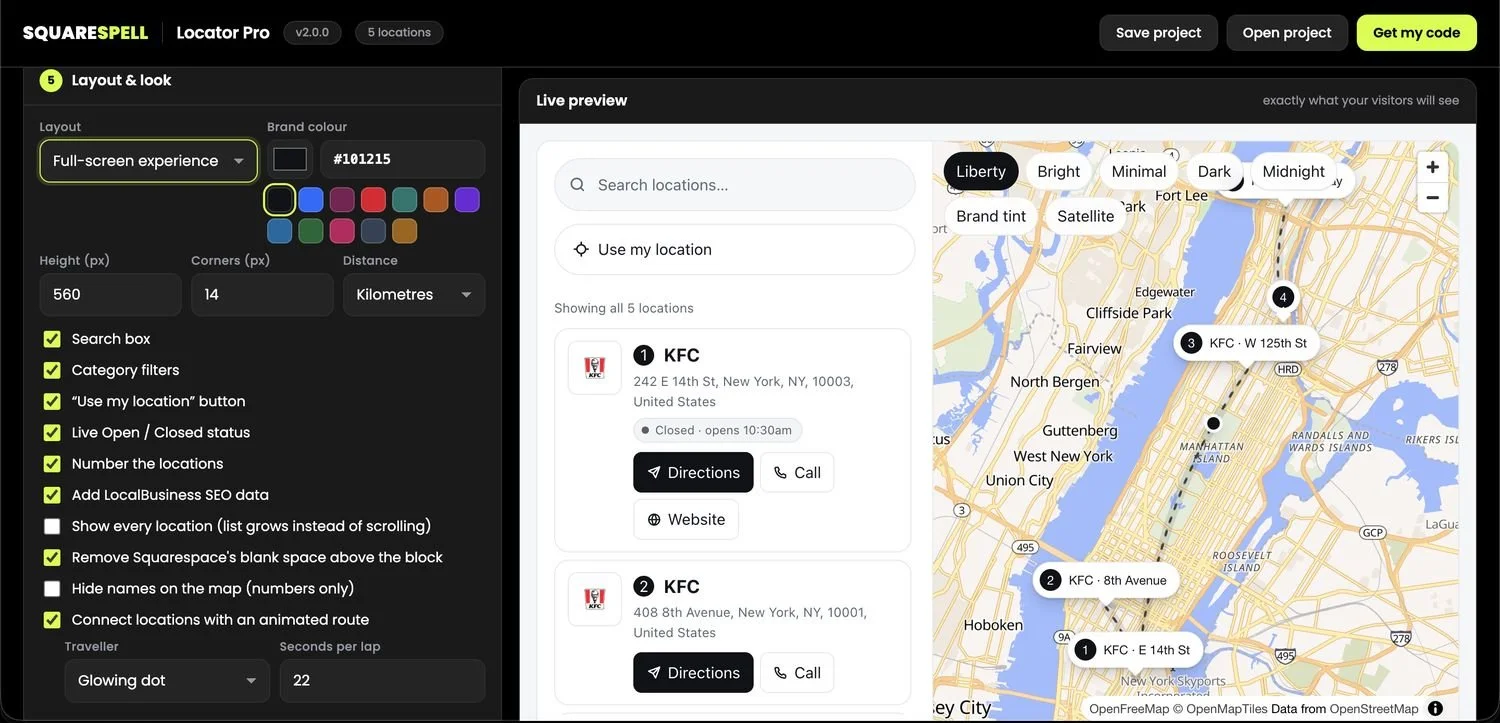
Full-screen experience selected. Included in your purchase no upgrade.
Brand color
Three ways to set it, and they stay in sync: the colorr square, the hex box (type or paste #E4002B), or one of the twelve preset swatches.
This colour drives the pins, the number badges, buttons, and the Brand tint map.
Size
Height: how tall the block is, in pixels. 560 is a good default.
Corners: corner rounding.
Distance: kilometres or miles, used by "Use my location".
Features
| Option | What it does |
|---|---|
| Search box | Visitors search by name, address, town, postcode, category or tag. |
| Category filters | Filter buttons built from your categories. Hidden if you only have one. |
| "Use my location" button | Finds the visitor's nearest branch and sorts by distance. |
| Live Open / Closed status | A live badge based on your opening hours, correct for each time zone. |
| Number the locations | Matching numbers on the cards and the map pins. |
| Add LocalBusiness SEO data | Structured data so Google can read your locations. Credited to you, not to us. |
| Show every location | The list grows to fit instead of scrolling inside a fixed box. |
| Remove Squarespace's blank space | Hides the empty status bar Squarespace puts above Code Blocks. |
| Hide names on the map | Numbered pins only. Useful when you have a lot of branches close together. |
| Connect locations with an animated route | A flowing dashed line between branches with a moving traveller. |
About the animated route: It suits a trail, a tour or a delivery round. For an ordinary store locator it's usually calmer to leave it off — visitors want the nearest branch, not a journey. Set the traveller to a glowing dot, plane or car, and the seconds per lap. It's switched off entirely for visitors who ask for reduced motion.
7- Check the hover card
In the preview, hover over any map pin. A business card appears with the logo, category, name, address, live open status, phone and a Directions button.
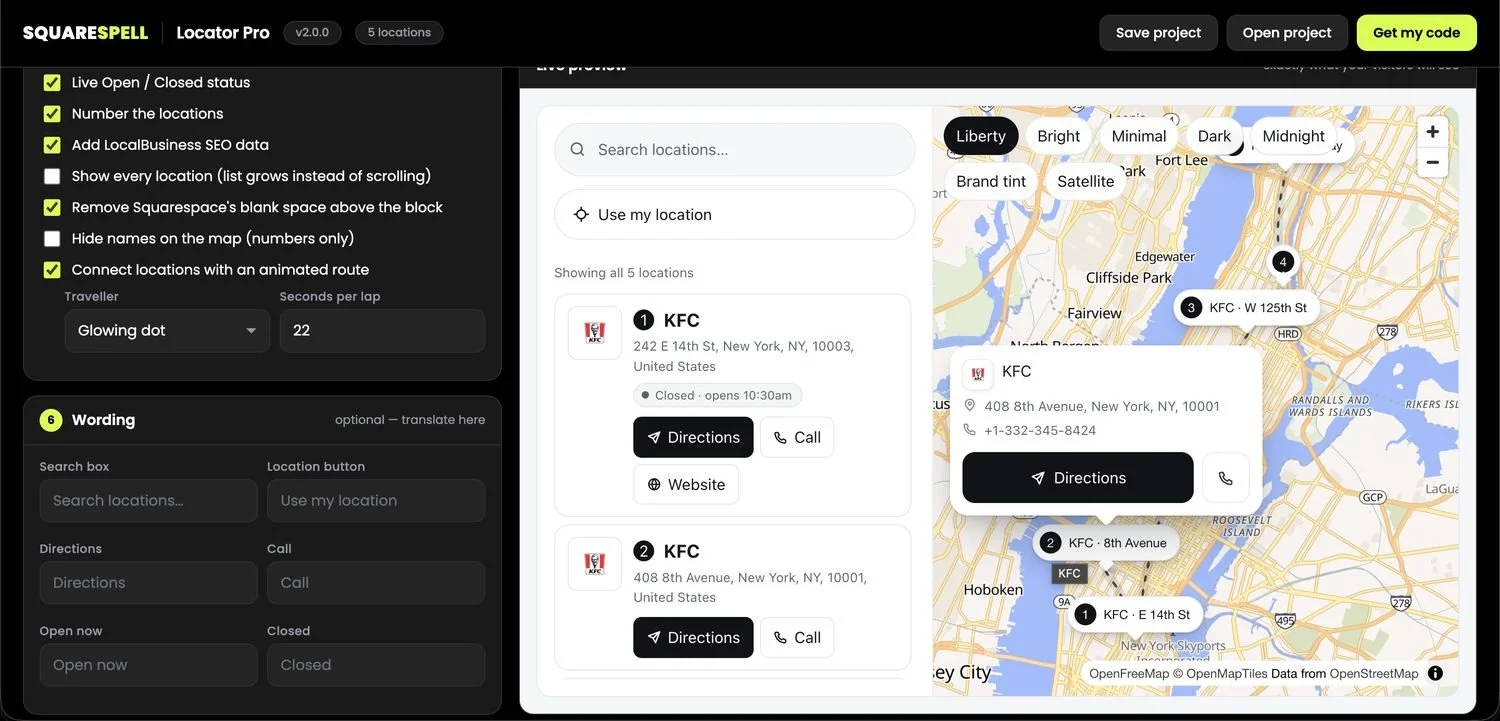
Move your mouse onto the card and it stays open, so the buttons are clickable.
Directions opens Google Maps and hands off to the Google Maps app on a phone.
On a touchscreen, the first tap opens the card rather than launching an app unexpectedly.
If a pin has no logo and no website, it shows the business initials in your brand color.
8- Wording & translation
Section 6 lets you rewrite every visible label search box, location button, Directions, Call, Open now, Closed.
Leave a box empty to keep the English default. To translate the locator, simply type your own language into each box.
9- Get your code
When the preview looks right, press Get my code in the top-right corner.
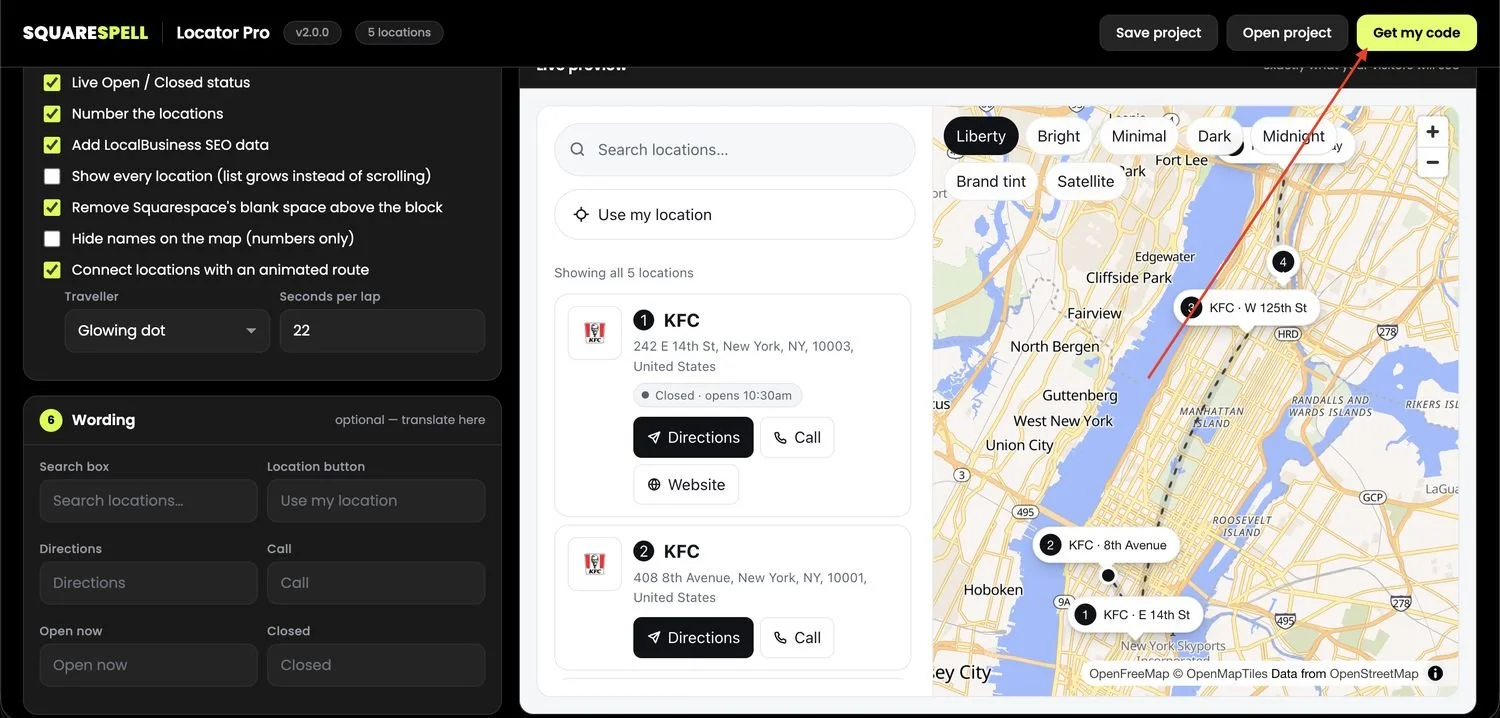
One button. Everything is generated for you.
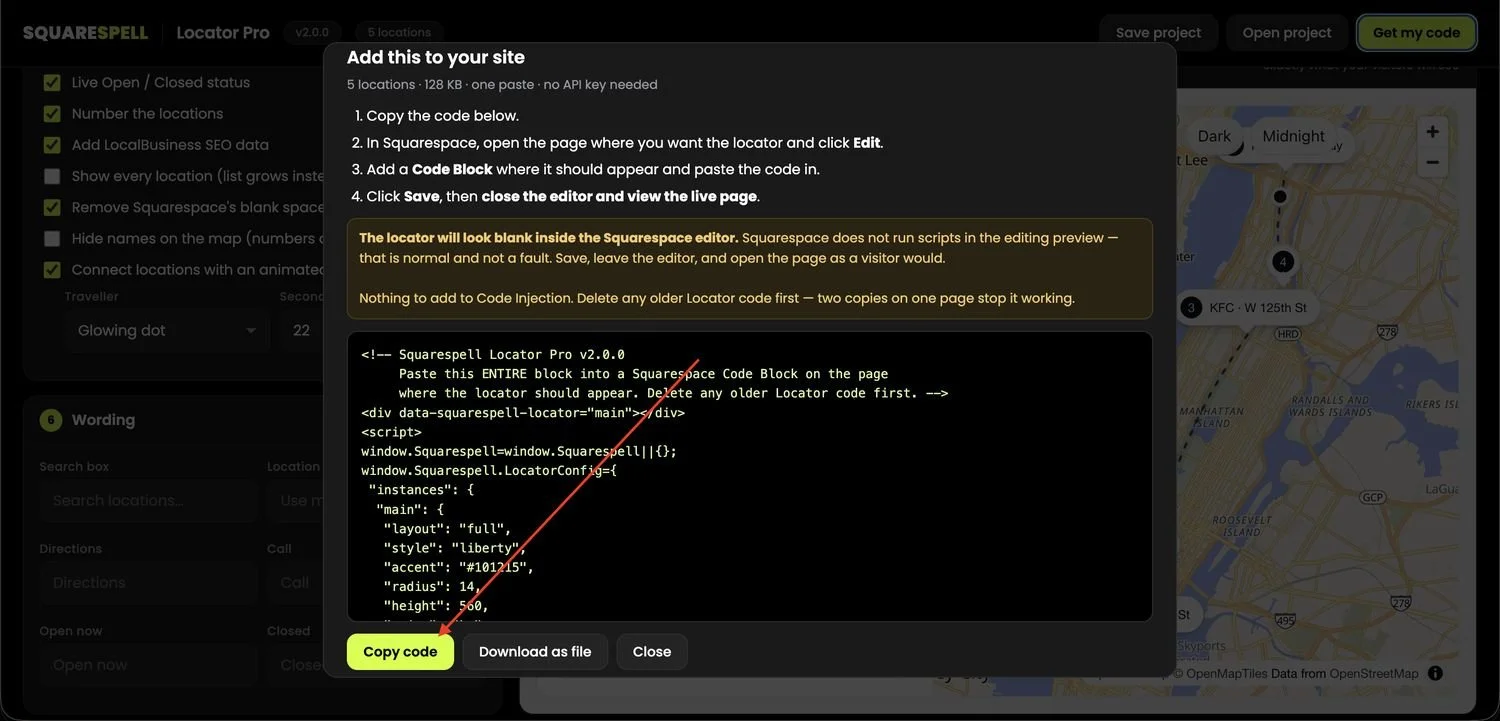
Press Copy code. Or Download as file if you'd rather keep a copy.
One paste, one Code Block: There is nothing to add to Code Injection, no separate footer step, and no API key to obtain.
10- Paste it into Squarespace
Open the page where you want the locator and click Edit.
Click + to add a block, type code in the search, and choose Code.
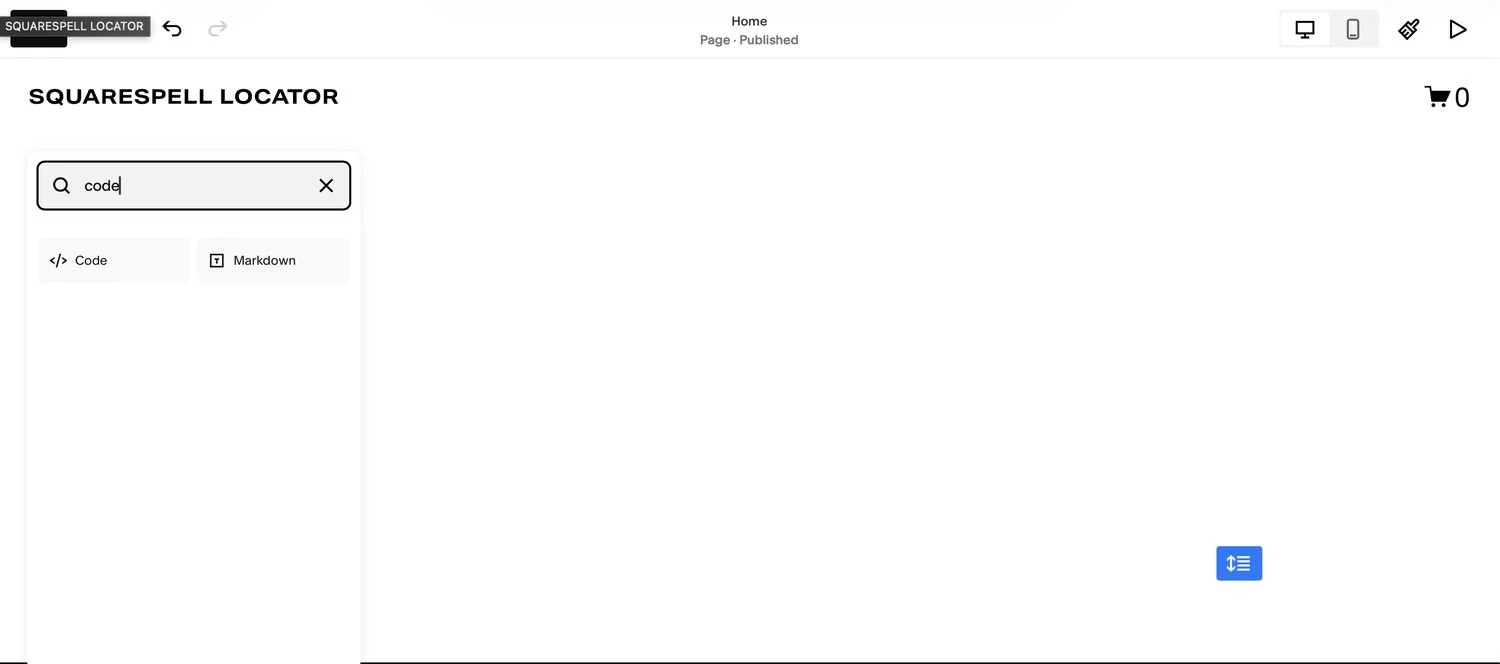
Search code and pick the Code block not Markdown.
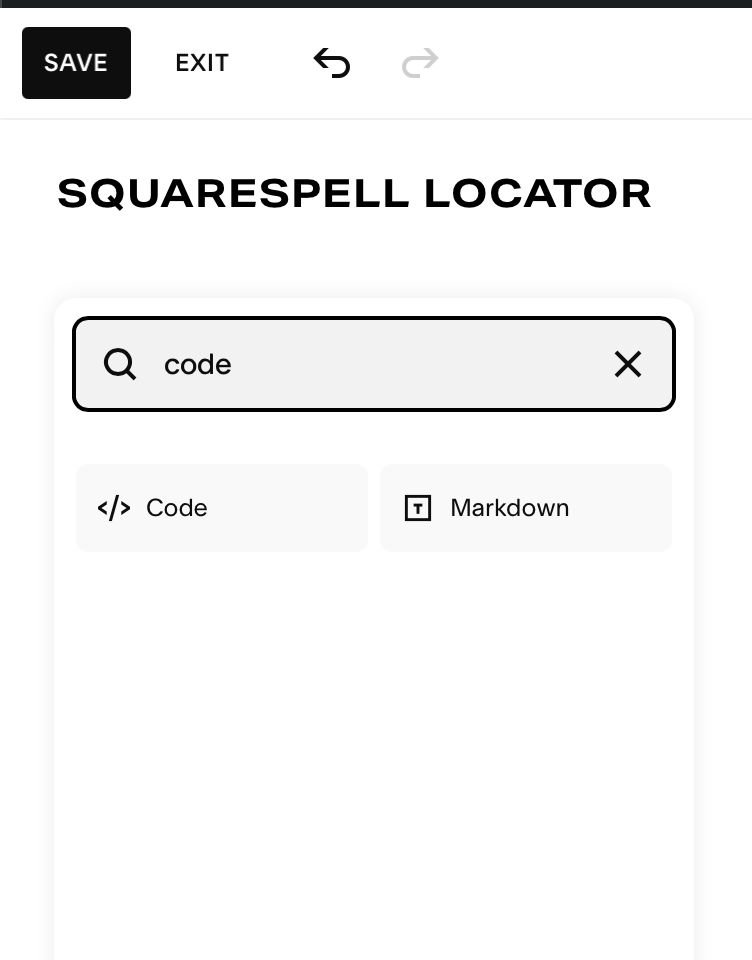
The same panel, closer up.
The Code Editor opens. Delete everything already in it (Squarespace pre-fills a placeholder), then paste your code.
Leave Mode set to HTML. Leave Display Source Code switched off.
Click Close, then Save.
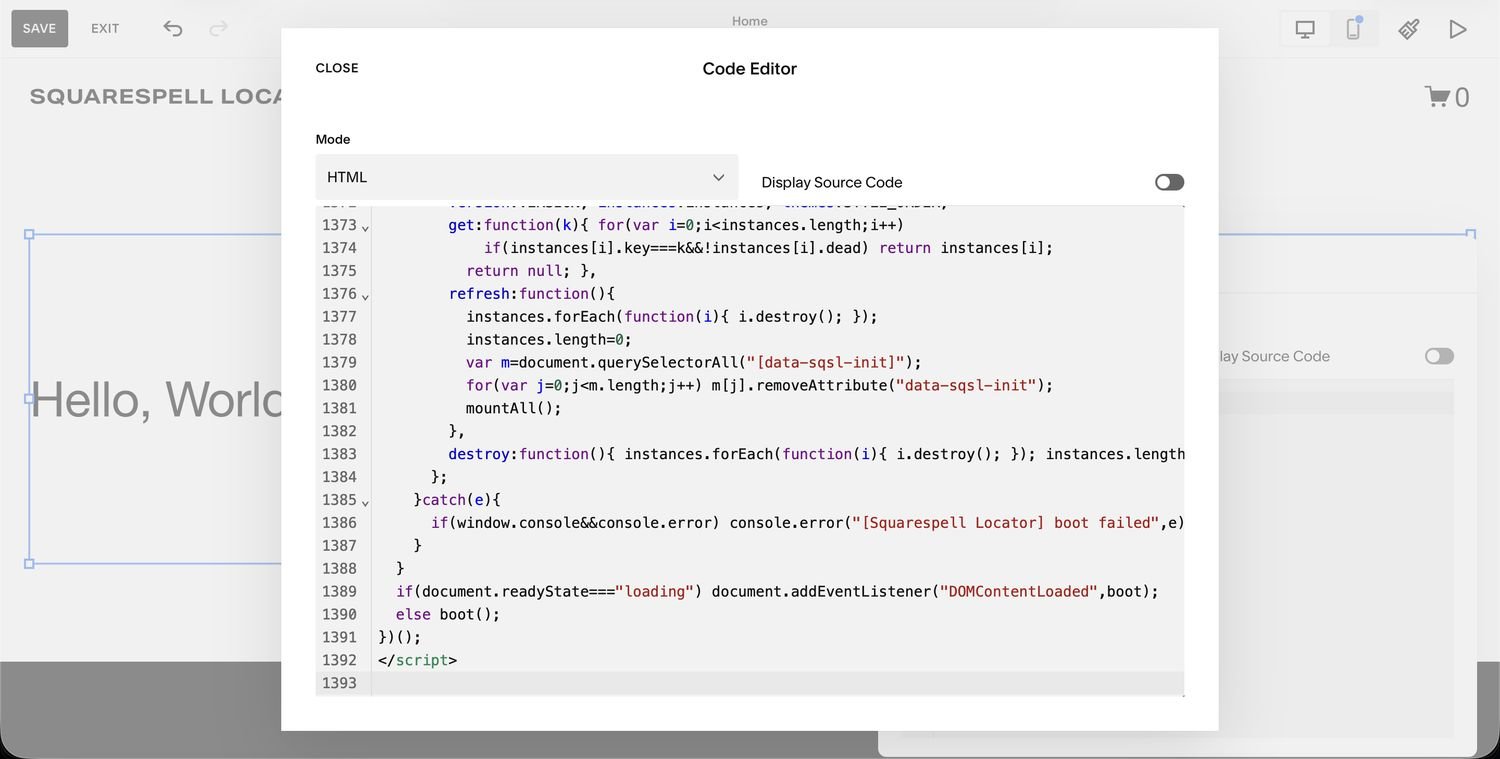
Mode HTML, Display Source Code off. Your pasted code ends with })(); then </script>.
Compatibility
Locator Pro works with both Squarespace 7.0 and 7.1, covering the full range of current Squarespace websites. It integrates through the standard Code Block feature, which means it works within Squarespace's existing page structure without modifying templates or injecting code into the site header.
Pricing
Locator Pro is available as a one-time purchase:
Single License: $85 (one website)
Multi-Use License: $150 (unlimited websites)
There are no monthly fees, no annual renewals, and no usage limits that scale with traffic. For a web designer or agency managing multiple client sites, the multi-use license covers every project at a single cost.
To put that in perspective, a monthly SaaS store locator at $25/month costs $300 in the first year alone. Locator Pro's single license pays for itself compared to that pricing within four months.
Who It's Built For
Locator Pro is designed for Squarespace website owners who need location finder functionality without complexity. According to Squarespell's product page, the target use cases include:
Retail businesses looking to help customers find store locations
Restaurants displaying multiple branches
Service businesses showing where customers can access services
Dealer networks providing location information to customers
Organizations creating a central location page for visitors
The common thread across all of these is a business that has physical locations and a Squarespace website that needs to connect the two.
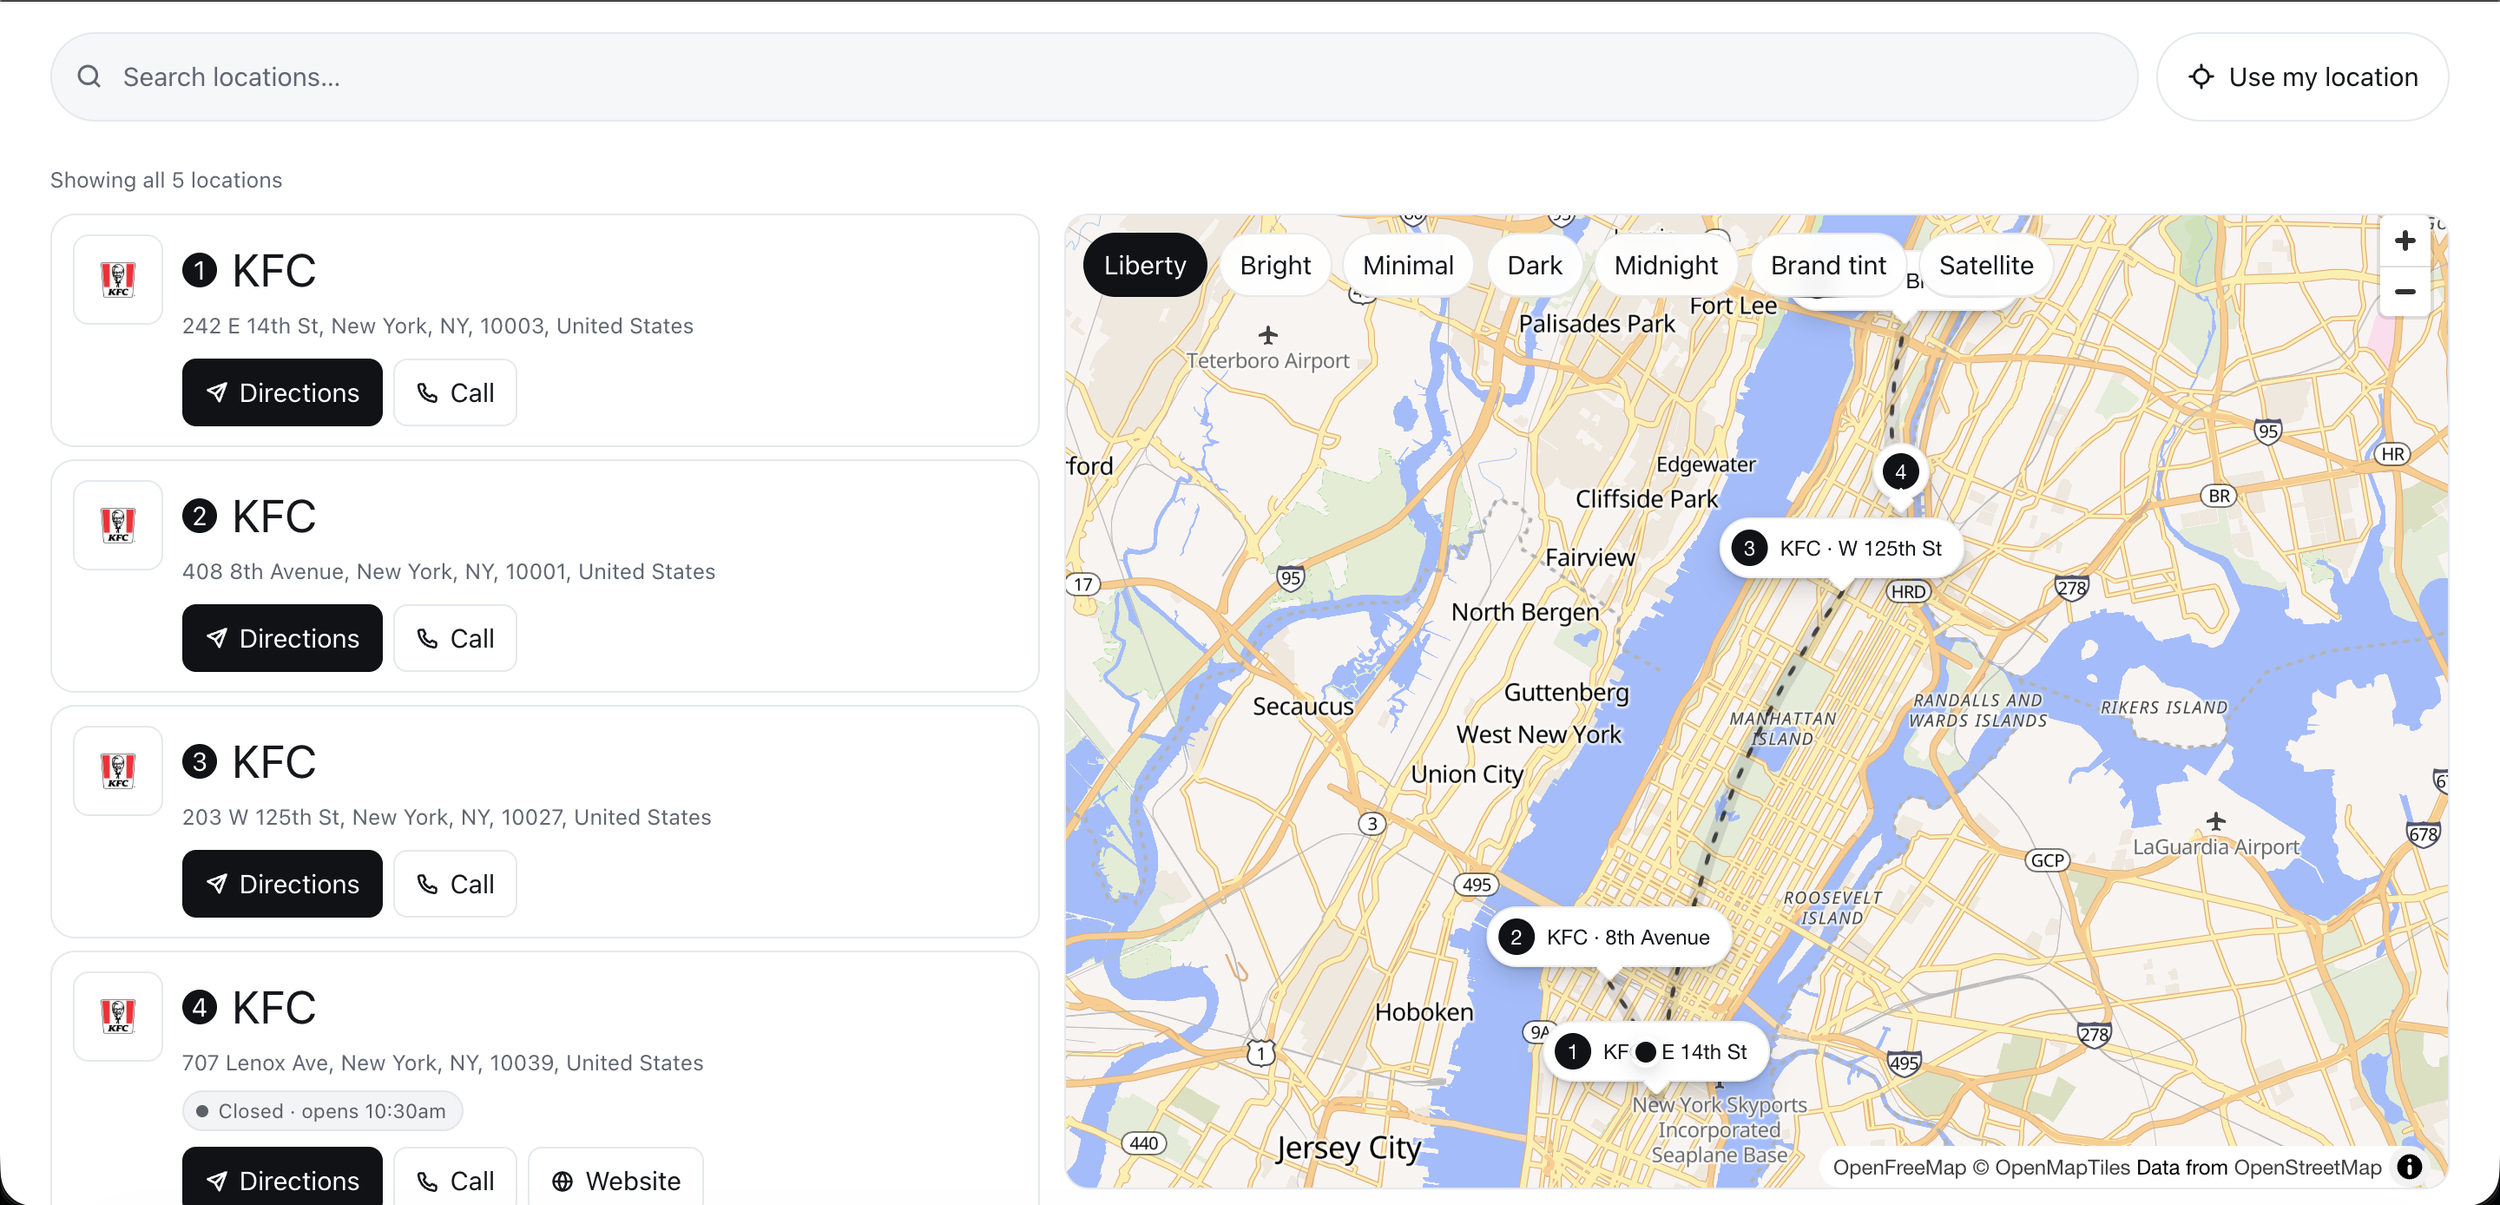
Add a Location Finder to Your Squarespace Website
Help visitors discover your business locations with Locator Pro a Squarespace compatible plugin designed for businesses that need a simple way to display locations online.
Create your locator, customize your setup, and add it to your Squarespace website without building a custom solution.
Locator Pro gives you:
A browser-based builder
Squarespace integration workflow
No-code setup experience
No API key requirement
Setting Up a Store Locator: Practical Considerations
Getting the plugin installed is only the beginning. How you structure and maintain your location data has a direct impact on how useful the locator is for your visitors.
Organize Your Location Data First
Before setting up any store locator, gather your location information into a clean format. For each location, you should have:
Official business name (exactly as it appears on signage and Google Business Profile)
Full street address
City, state/province, and postal code
Phone number
Business hours (including any variations for weekends or holidays)
Any location-specific notes (e.g., "entrance on Oak Street" or "located inside Westfield Mall")
Getting this information organized before you start building saves time and prevents errors. If you have more than a handful of locations, a spreadsheet is the most practical way to manage this.
Think About the Visitor's Journey
Where you place the store locator on your site matters. Most businesses create a dedicated page (often titled "Locations," "Find a Store," or "Find Us") and link to it from the main navigation. This makes it immediately discoverable.
Some businesses also embed the locator on the homepage, particularly if driving foot traffic to physical locations is a primary business goal. Others place it on product pages, making it easy for visitors to find where they can buy a product they've just been looking at online.
The right choice depends on your business. If people primarily come to your site to find a location, put the locator front and center. If location finding is secondary to browsing products or learning about services, a dedicated page linked from the navigation is usually sufficient.
Mobile Experience Matters
Over half of local searches happen on mobile devices. When someone searches "coffee shop near me" on their phone and lands on your website, the store locator is often the very first thing they interact with.
Test your locator on an actual phone, not just in a resized browser window. Check that the search input is easy to tap, that location results are readable without zooming, and that the directions button actually opens the phone's maps application. Small friction points on mobile, like a search field that's too narrow or a map that's hard to navigate with touch, can cause visitors to give up and try a competitor instead.
Keep Location Information Current
An outdated store locator is worse than no store locator at all. If a visitor drives twenty minutes to a location that has moved or closed, you've not only lost a sale but damaged their trust in your business.
Build a habit of reviewing your location data regularly. When hours change for holidays, when a location moves to a new address, when a new branch opens, update the locator immediately. If your plugin supports spreadsheet-based management, designate someone on your team to own that spreadsheet and keep it current.
Common Questions About Squarespace Store Locators
Does Squarespace have a built-in store locator?
No. Squarespace offers a Map Block that displays a single location pin, but it does not include any store locator functionality. There is no built-in way to show multiple searchable locations on a map. A third-party plugin is required for store locator features.
Do I need coding skills to add a store locator to Squarespace?
Not with most modern plugins, including Locator Pro. The typical process involves configuring your locator in an external builder, then pasting the generated code into a Squarespace Code Block. This is a standard Squarespace feature that requires no programming knowledge.
Do I need a Google Maps API key?
It depends on the plugin. Many SaaS store locator tools require you to create a Google Cloud account and generate an API key, which can involve setting up billing. Some solutions, including Locator Pro, handle map functionality without requiring you to obtain or manage API keys yourself.
Will a store locator slow down my Squarespace site?
A well-built store locator plugin should have minimal impact on page load speed. Since most plugins load their map and location data asynchronously (after the main page has loaded), the rest of your page renders normally while the locator initializes. If you notice performance issues, check whether the plugin loads unnecessary scripts on pages where the locator isn't displayed.
Can I show different types of locations on the same map?
This depends on the specific plugin. Some store locator tools support categories or tags that let you distinguish between, for example, retail stores and service centers. Check whether the plugin you're evaluating offers location categorization and filtering.
What Squarespace plans support store locator plugins?
Any Squarespace plan that includes Code Block access can support a store locator plugin. This typically means the Business plan or higher. Personal plans on Squarespace may have limited or no access to Code Blocks, which would prevent plugin installation.
How many locations can I add?
This varies by plugin. Some free or low-tier plans limit you to a set number of locations, while others allow unlimited entries. Locator Pro does not impose location limits tied to pricing tiers, since it uses a one-time purchase model rather than tiered subscriptions.
Is a store locator different from embedding Google Maps?
Yes. Embedding Google Maps (through Squarespace's Map Block or a manual embed) gives you a static map view of one or more pinned addresses. A store locator adds interactive functionality: visitors can search by their location, see a list of nearby results, view details for each location, and get directions. It's the difference between showing locations and helping visitors find locations.
Moving Forward
Adding a store locator to a Squarespace website is one of those improvements that directly connects your online presence to real-world customer visits. The technology is straightforward, the setup process with modern plugins takes minutes rather than hours, and the impact on visitor experience is immediate.
If you're evaluating options, start by clarifying what you need. How many locations do you have? Will that number grow? Do you need search and filtering? What's your comfort level with technical configuration? How do you feel about monthly costs versus a one-time purchase?
For Squarespace website owners looking for a focused, no-code solution without recurring fees or API key requirements, Locator Pro is worth a look. It's built specifically for the platform, installs through a standard Code Block, and handles the map functionality that Squarespace's native tools leave out.
Your physical locations are one of your most valuable business assets. Making them easy to find online shouldn't require a developer, a monthly subscription, or a weekend of troubleshooting.